-->

Configure > Source Code Management > 

  • Polling ignores commits in certain paths 옵션 설정
  • Included Regions에 포함할 모듈 및 파일
  • Excluded Regions에 제외할 모듈 입력
    • Java 정규식으로 표현해야 합니다. (^api/.*)
  • Force polling using workspace 옵션 체크

객체지향 프로그래밍을 할 때 DTO(Data Trasnport Object)와 VO(Value Object) 그리고 Entity를 다루는데, 이때 각각의 객체로 형변환 하는 Mapping 과정이 필요하다. Kotlin에서는 apply 확장 함수를 통해 그나마 조금 더 쉽게 할 수 있지만 역시 map struct가 근본임을 부정할 수 없다.

* 컴파일 시점에 체크

* 속도 빠르다

* 간단하다


문제는 그동안 써온 java, kotlin이 아닌 protobuf를 변환할 때 일어난다.

protobuf에는 `repeated` 라는 키워드가 있는데 list 같은 자료구조를 표현하기 위해 사용된다.  

repeated string을 compile시에 ProtocolStringList로 변환된다. 하지만 kotlin에서는 protocolStringList를 List<String>으로 인식하지 못하여 제대로 매핑이 되지 않는다. 그래서 하나하나 매핑해주거나 https://github.com/entur/mapstruct-spi-protobuf 요 라이브러리를 사용해야 한다.


implementation"org.mapstruct:mapstruct:${mapstructVersion}"
annotationProcessor"org.mapstruct:mapstruct-processor:${mapstructVersion}"
annotationProcessor"no.entur.mapstruct.spi:protobuf-spi-impl:LATEST.VERSION"
@Mapper(
    componentModel = "spring",
    uses = [LocalDateTimeConverter::class],
    nullValueCheckStrategy = NullValueCheckStrategy.ALWAYS, // null 값 체크
    collectionMappingStrategy = CollectionMappingStrategy.ADDER_PREFERRED, // Protobuf repeated 와 List 매핑 위함
)

그리고 이런식으로 ADDER_PREFERRED 설정을 해야한다.


근데 변환하려고 하니 무조건 repeated 설정한 변수 네이밍에 -List가 붙는다. 그래서 만약 dto의 변수명이 events 라면 target에 이렇게 해줘야한다.

@Mapping(source = "events", target = "eventsList") // proto에 repeated 쓰면 자동으로 suffinx로 -List가 붙음
    fun toProto(dto: Dto): ProtobufResponse


조회수 기준

  • 비회원도 조회수가 올라야 한다.
  • 상세 페이지 바로 접근 시 조회수가 올라야 한다.
  • 새로고침 시 조회수를 올리지 않아야 한다.
  • 일정 시간 주기로 조회 가능 여부를 초기화한다. →  10분 설정


방안

  1. 조회수 테이블로의 UpdateOrInsert
    1. 트래픽이 많아질 수록 DB 부하가 예상된다.
    2. 개발 공수가 적다.
    3. 중복 조회 이슈가 생긴다.
  2. Redis를 이용한 Wirte Back 전략
    1. Redis에 먼저 적재해두고 일정 주기로 DB에 insert 하는 배치 실행 
    2. 중복 조회를 막을 수 있다.
    3. 개발 공수가 적지 않다.
    4. 일관성 이슈가 발생할 수 있다.
  3. Redis 이용한 Write Through 전략
    1. Redis에 적재 후 DB에 적재
    2. 일정 시간 동안 Redis 에 있는 key 값으로는 DB insert 못하게 튕겨냄


중복 조회 이슈

중복 조회를 막기 위한 전략을 생각한다.

  • ip 주소 기반
    • 동일한 네트워크에 있는 사용자들이 동일한 ip를 사용하는 경우 사용자 식별에 어려움
  • Mac Address 기반
    • 저장 값이 매우 길다.
  • 쿠키 기반
    • 고의 삭제 가능
  • 세션 기반
    • 사용자별로 조회 기록 관리 가능
    • 서버가 여러 개인 분산 환경에서는 세션이 여러개 생겨날 수 있어 적절하지 않음.
  • 로그인 사용자 기반
    • 비회원 접속이 가능하기 때문에 적용하기 어려움

중복 조회가 서비스에 영향을 미치는 정도는 낮다.


구현

// Controller
    @GetMapping("")
    fun getPostByPostSeq(
        @Valid @ParameterObject postReq: PostReq,
        request: HttpServletRequest,
    ): PostDetailRes? {
        // 게시물을 조회하고 결과 반환
        val postRes = postQueryService.findPostByPostSeq(postReq) ?: return null

        // 환경 변수가 설정된 경우에만 조회수 체크 기능 활성화
        System.getenv(POST_VIEW_FEATURE_TOGGLE_ENV)?.takeIf { it.isNotBlank() }?.let {
            val clientIp = getClientIp(request)
            postViewCommandService.updatePostViews(clientIp, postReq)
        }

        return postRes
    }
// Service
    @Transactional
    fun updatePostViews(
        clientIp: String,
        req: PostReq,
    ) {
        // Redis 캐시에서 중복 확인 및 저장
        if (clientIp.isNotBlank() && req.postSeq != null) {
            // 이미 10분 내 동일한 조회가 있었다면 종료
            if (!redisService.insertViewIfNotRecent(clientIp, req, postViewExpireMinutes)) return

            // todo Redis 정상적으로 테스트 되면 삭제해도 되지 않을까
            // DB에서 한번 더 중복 확인 후 데이터 삽입
            val exists =
                repository.existsByPostSeqAndInfoIpAndInsDateAfter(
                    req.postSeq,
                    clientIp,
                    LocalDateTime.now().minusMinutes(postViewExpireMinutes),
                )

            if (!exists) { // 중복이 없으면 DB에 삽입
                repository.save(mapper.toEntity(clientIp, req))
            }
        }
    }
@Service
class RedisService(
    private val redisRepository: RedisRepository,
) {
    /**
     * @param postId 게시물의 고유 번호
     * @param clientIp 클라이언트 IP 주소
     * @param expireMinutes 캐시 만료 시간 (기본값 10분)
     * @return Boolean 해당 키가 이미 존재하면 false, 새로 저장되면 true
     */
    fun insertViewIfNotRecent(clientIp: String, req: RideReq, expireMinutes: Long): Boolean {
        val postId = req.postId ?: return false
        val key = "postView:$postId:$clientIp"

        // Redis에서 키 존재 여부 확인
        if (redisRepository.existsKey(key)) {
            // 키가 이미 존재하면 중복된 조회로 간주
            return false
        }

        val postViewDto = RideViewDto(
            postId = postId,
            infoIp = clientIp,
            paxId = req.paxId
        )

        // 키가 없으면 Redis에 저장하고 만료 시간 설정
        return redisRepository.saveKeyWithExpiration(postViewDto, expireMinutes)
    }

환경변수를 가지고 피쳐토글로 구현했다.

기본적으로 K-V DB인 Redis는 json 형태의 데이터를 저장한다.

이를 protobuf 형식의 바이너리 형태로 넣으면 몇가지 이점이 있다.

  1. 사용량을 크게 줄일 수 있다.
  2. Redis 데이터의 Schema가 생성되므로 명확하게 스펙관리를 할 수 있다.
  3. Redis의 중첩 데이터를 효율적으로 관리할 수 있다.

똑똑한 사람이 이미 만들어 둔 https://github.com/sewenew/redis-protobuf 패키지를 통해 json - protobuf 직렬화, 역직렬화가 가능하다. 아 정확히는 직렬화가 아니라 마샬링이라고 해야한다. 

단점은 우리가 redis 를 직접 조회해서 나오는 데이터는 볼 수 없다. 어차피 서버 통해서 언마샬링 할거니까 괜찮다!

자체적으로 메소드 내에서 ByteArray로 변환하려고 했는데 잘 안되더라. Config에서 RedisTemplate을 설정해줘야 정상 작동했다.

    @Bean
    fun redisTemplate(): RedisTemplate<String, ByteArray> {
        val template = RedisTemplate<String, ByteArray>()

        // Key는 String으로, Value는 ByteArray로 설정
        template.keySerializer = StringRedisSerializer()
        template.valueSerializer = RedisSerializer.byteArray()      

        return template
    }
@Repository
class RedisRepository(
    private val redisTemplate: RedisTemplate<String, ByteArray>,
) {
    // Protobuf 데이터를 불러오는 메서드
    fun <T : com.google.protobuf.Message> getData(
        key: String,
        parser: com.google.protobuf.Parser<T>
    ): T? {
        val redisValue = redisTemplate.opsForValue().get(key)
        return redisValue?.let { parser.parseFrom(redisValue) } // Protobuf 역직렬화
    }

    // Protobuf를 저장할 때 사용하는 메서드
    fun saveData(
        key: String,
        value: com.google.protobuf.Message // Protobuf Message
    ) {
        try {
            val byteArray = value.toByteArray()
            println("Saving key: $key with value size: ${byteArray.size}") // 로그 추가
            redisTemplate.opsForValue().set(key, byteArray) // Protobuf는 byte array로 저장
        } catch (e: Exception) {
            e.printStackTrace()
        }
    }
}


서비스 레이어에서는 mapper를 통해 protobuf로 변환해주는 작업이 필요하다.

    // 이벤트 정보 조회 로직
    fun getEventInfo(eventNo: Long): EventMasterDto? {
        val key = getEventKey(eventNo)
        val byteArray = redisRepository.getData(key, RedisEventInfoMessage.parser()) // message
        return byteArray?.let { redisEventMapper.toDto(it) } // Protobuf 역직렬화
    }

    // 이벤트 정보 저장 로직
    fun setEventInfo(eventNo: Long, eventDto: EventMasterDto) {
        val key = getEventKey(eventNo)
        val protobufEvent = redisEventMapper.toProto(eventDto)
        redisRepository.saveData(key, protobufEvent)
    }


결과적으로 Redis에는 이런 데이터가 들어간다. 데이터 길이가 304다.

{��Sample Event"���*����2PERIOD:���B�ԡ�JCOUPONP�XdbACTIVEjYrYzSample Global Event (EN)�示例全球事件 (ZH)�AUTO����LIMIT��NO_LIMIT�
�RANDOM�LIMIT�2�N�Y�Y�GMARKET��Y�	VIP Brand�APPROVED�admin�����Y���Y�Y�encryptedString123


위 데이터를 언마샬링하면 아래와 같은 데이터가 된다. 요 데이터는 600~650 정도 되는듯

{
  "eventNo": "123",
  "eventGroupNo": "67890",
  "eventName": "Sample Event",
  "eventStartDate": "2024-09-30T12:00:00Z",
  "eventEndDate": "2024-10-10T12:00:00Z",
  "appEnablePeriodType": "PERIOD",
  "appEnablePeriodStartDate": "2024-09-30T00:00:00Z",
  "appEnablePeriodEndDate": "2024-10-10T23:59:00Z",
  "rewardType": "COUPON",
  "rewardPolicyNo": "1111",
  "rewardCnt": 100,
  "status": "ACTIVE",
  "globalShopUseYn": "Y",
  "globalShopMessageUseYn": "Y",
  "globalShopEngEventName": "Sample Global Event (EN)",
  "globalShopChnEventName": "示例全球事件 (ZH)",
  "appWay": "AUTO",
  "appDeductCnt": 1,
  "appRandomCodeMasterNo": "2222",
  "appLimitType": "LIMIT",
  "appLimitCnt": 5,
  "winLimitType": "NO_LIMIT",
  "winLimitCnt": 10,
  "winWay": "RANDOM",
  "winTotalCntLimitType": "LIMIT",
  "winTotalCnt": 50,
  "asyncWinYn": "N",
  "groupRetryEventYn": "Y",
  "myPageExposeYn": "Y",
  "siteType": "GMARKET",
  "rewardValidDay": 7,
  "vipDisplayYn": "Y",
  "vipDisplayBrandName": "VIP Brand",
  "apprStatus": "APPROVED",
  "apprOprt": "admin",
  "apprDate": "2024-09-29T10:00:00Z",
  "simpleJoinCertUseYn": "Y",
  "eventApplyLimitNo": "3333",
  "groupEventYn": "Y",
  "couponpackUseYn": "Y",
  "encStr": "encryptedString123"
}


<참고>

https://engineering.ab180.co/stories/thanos-redis

'Back-end' 카테고리의 다른 글

Protobuf와 Map Struct 친해지길 바래  (0) 2024.10.15
[Redis] 나야 조회수  (3) 2024.10.15
[gRPC] Armeria + gRPC 띄워보기  (7) 2024.10.07
[gRPC] gRPC란  (3) 2024.10.02
[Spring/Thymeleaf] option 태그에 enum 동적으로 넣기  (0) 2024.08.10

Armeria 는 라인에서 만든 오픈소스 웹 프레임워크로 개발 생산성을 높여준다.

만든 사람의 직강을 한번 보자. Netty를 리드한 오픈소스 컨트리뷰터 이희승님이다.

https://www.youtube.com/watch?v=xMHIMZ8fNuo

이희승님 인터뷰


비동기를 사랑하는 오픈소스 개발자, 이희승

세 번째 인터뷰의 주인공은 오픈소스 개발자 이희승 님입니다. 비동기를 사랑하는 오픈소스 개발자, 희승 님의 이야기를 만나 보시죠. Q. 희승 님 안녕하세요. 먼저 간단하게 자기소개 부탁드

engineering.linecorp.com


결론적으로 말하면 gRPC, 그리고 Rest API, Thrift 등 다양한 프로토콜을 사용할 때와 분산 환경에서의 Reactive ㅅProgramming이 필요할때 Armeria가 도움이 된다.

프레임워크 레벨에서 서버별 헬스체크를 통한 써킷브레이커 작동도 가능하고 RetryingClient 등으로 재시도 전략을 세울 수도 있다. 간단히 메트릭을 수집해 모니터링을 할 수도 있다. 별다른 라이브러리를 붙이지 않고도 작동하는 것이 매우 편하다.

무엇보다 gRPC 환경에서 웹 브라우저에 Swagger 같은 것을 띄우기가 힘든데 스펙을 살펴보고 테스트 해볼 수 있도록 Docs Service를 제공하는게 제일 좋다.

간단하게 아래 프로젝트 예제를 살펴보자.


Intellij에서 Protocol Buffers 플러그인을 설치해준다.


Proto 파일 생성

gRPC에서 사용하는 Protobuf는 가이드에 따라 작성하면 된다. 

syntax = "proto3";

option java_multiple_files = true;
option java_package = "com.minggu.common";
option java_outer_classname = "ServiceProto";

package common.proto;

/**
 이벤트 응모 Apply Service 정의
 */
service ApplyService {
    rpc applyCoupon (ApplyCouponRequest) returns (ApplyCouponResponse);
}

message ApplyCouponRequest {
    string couponNo = 1;
    string userId = 2;
    string custNo = 3;
}

message ApplyCouponResponse {
    bool isSuccess = 1;
    string applyId = 2;
    string message = 3;
}

/**
 이벤트 조회용 Retrieve Service 정의
 */
service RetrieveService {
    rpc GetRetrieveDetail (RetrieveRequest) returns (RetrieveResponse);
}

message RetrieveRequest {
    string retrieve_id = 1;
}

message RetrieveResponse {
    string retrieve_name = 1;
    string retrieve_detail = 2;
}


gRPC 패키지 설정

common 모듈에 gRPC 설정을 하고 apply 모듈에 armeria 설정을 한다.

import com.google.protobuf.gradle.ProtobufPlugin
import com.google.protobuf.gradle.id
import java.util.*

object Version {
    const val GRPC = "3.24.0"
    const val GRPC_KOTLIN = "1.4.1"
    const val GRPC_PROTO = "1.66.0"
}

dependencies {
    compileOnly("javax.annotation:javax.annotation-api:1.3.2")

    // gRPC
    api("com.google.protobuf:protobuf-java-util:${Version.GRPC}")
    api("io.grpc:grpc-protobuf:${Version.GRPC_PROTO}")
    api("io.grpc:grpc-kotlin-stub:${Version.GRPC_KOTLIN}")

    // gRPC Netty
    api("io.grpc:grpc-netty-shaded:${Version.GRPC_PROTO}")
//    api("io.grpc:grpc-netty:${Version.GRPC_PROTO}")

    // Test
    testImplementation("io.grpc:grpc-testing:${Version.GRPC_PROTO}")
}

configurations.forEach {
    if (it.name.lowercase(Locale.getDefault()).contains("proto")) {
        it.attributes.attribute(Usage.USAGE_ATTRIBUTE, objects.named(Usage::class.java, "java-runtime"))
    }
}

protobuf {
    protoc {
        artifact = "com.google.protobuf:protoc:${Version.GRPC}"
    }
    plugins {
        id("grpc") {
            artifact = "io.grpc:protoc-gen-grpc-java:${Version.GRPC_PROTO}"
        }
        id("grpckt") {
            artifact = "io.grpc:protoc-gen-grpc-kotlin:${Version.GRPC_KOTLIN}:jdk8@jar"
        }
    }
    generateProtoTasks {
        all().forEach {
            it.plugins {
                id("grpc")
                id("grpckt")
            }
//            it.generateDescriptorSet = true
//            it.descriptorSetOptions.includeSourceInfo = true
//            it.descriptorSetOptions.includeImports = true
                // buildDir 대신 layout.buildDirectory쓰면 에러난다.
//            it.descriptorSetOptions.path = "${buildDir}/resources/META-INF/armeria/grpc/service-name.dsc"
        }
    }
}

sourceSets {
    main {
        java{
            srcDir("build/generated/source/proto/main/grpckt")
            srcDir("build/generated/source/proto/main/grpc")
            srcDir("build/generated/source/proto/main/java")
        }
    }

//    proto { // protoc가 컴파일할 proto message들의 위치
//         default는 "src/main/proto" 이다.
//        srcDirs '{git remote 저장소 이름}/'
//    }
}

tasks.getByName("bootJar") {
    enabled = false
}

tasks.getByName("jar") {
    enabled = true
}

gRPC로 프로젝트를 시작할 때 가장 오랜 시간이 걸리는 작업이 이 build.gradle 설정이다.. 버전별로 sensitive해서 아주 많은 빌드를 해봐야한다.. proto 파일을 가지고 kotlin과 java 파일로 generate 해주는 작업을 gradle에서 하기 때문에 protobuf 블럭을 설정해 빌드시에 파일이 생성되도록 해야한다. 또 코틀린을 사용하기 때문에 코틀린 파일로 만들어주는 설정들도 해야하고..


Web 서버 모듈 설정

루트의 build.gradle.kts 안에는 웹 모듈에서 사용할 Armeria 패키지를 주입시켜준다. 

object Version {
    const val ARMERIA = "1.30.0"
}

project(":apply") {
    dependencies {
        implementation(project(":common"))
        implementation(platform("com.linecorp.armeria:armeria-bom:${Version.ARMERIA}"))
        implementation("com.linecorp.armeria:armeria:${Version.ARMERIA}")
        implementation("com.linecorp.armeria:armeria-grpc:${Version.ARMERIA}")
        implementation("com.linecorp.armeria:armeria-spring-boot3-starter:${Version.ARMERIA}")
        implementation("com.linecorp.armeria:armeria-tomcat9")
        implementation("com.linecorp.armeria:armeria-grpc-kotlin")
        compileOnly("org.apache.tomcat:annotations-api:6.0.53")
    }
}


Armeria 서버 코드 생성

예제 소스를 참고하면 좋다.

package com.minggu.apply

import com.minggu.common.ApplyCouponRequest
import com.minggu.common.ApplyServiceGrpc
import com.minggu.common.MoaLogger
import com.minggu.santa.core.apply.service.grpc.ApplyCouponServiceImpl
import com.linecorp.armeria.server.Server
import com.linecorp.armeria.server.grpc.GrpcService
import com.linecorp.armeria.common.grpc.GrpcSerializationFormats
import com.linecorp.armeria.server.ServerBuilder
import com.linecorp.armeria.server.docs.DocService
import com.linecorp.armeria.server.docs.DocServiceFilter
import io.grpc.protobuf.services.ProtoReflectionService
import io.grpc.reflection.v1alpha.ServerReflectionGrpc
import org.slf4j.LoggerFactory


object ArmeriaServer {

    private val logger = LoggerFactory.getLogger(ArmeriaServer::class.java)

    @JvmStatic
    fun main(args: Array<String>) {
        val server = newServer(8080, 8443)

        server.closeOnJvmShutdown()

        server.start().join()
        server.activePort()?.let {
            val localAddress = it.localAddress()
            val isLocalAddress =
                localAddress.address.isAnyLocalAddress ||
                    localAddress.address.isLoopbackAddress
            logger.info(
                "Server has been started. Serving DocService at http://{}:{}/docs",
                if (isLocalAddress) "127.0.0.1" else localAddress.hostString,
                localAddress.port,
            )
        }
    }

    private fun newServer(
        httpPort: Int,
        httpsPort: Int,
        useBlockingTaskExecutor: Boolean = false,
    ): Server {
        val exampleRequest: ApplyCouponRequest = ApplyCouponRequest.newBuilder().setCouponNo("couponNo123124").build()
        val grpcService =
            GrpcService.builder()
                .addService(ApplyCouponServiceImpl())
                // See https://github.com/grpc/grpc-java/blob/master/documentation/server-reflection-tutorial.md
                .addService(ProtoReflectionService.newInstance())
                .supportedSerializationFormats(GrpcSerializationFormats.values())
                .enableUnframedRequests(true)
                // You can set useBlockingTaskExecutor(true) in order to execute all gRPC
                // methods in the blockingTaskExecutor thread pool.
                .useBlockingTaskExecutor(useBlockingTaskExecutor)
                .build()
        return Server.builder()
            .http(httpPort)
            .https(httpsPort)
            .tlsSelfSigned()
            .service(grpcService) // You can access the documentation service at http://127.0.0.1:8080/docs.
            // See https://armeria.dev/docs/server-docservice for more information.
            .serviceUnder(
                "/docs",
                DocService.builder()
                    .exampleRequests(
                        ApplyServiceGrpc.SERVICE_NAME,
                        "Hello",
                        exampleRequest,
                    )
                    .exampleRequests(
                        ApplyServiceGrpc.SERVICE_NAME,
                        "LazyHello",
                        exampleRequest,
                    )
                    .exampleRequests(
                        ApplyServiceGrpc.SERVICE_NAME,
                        "BlockingHello",
                        exampleRequest,
                    )
                    .exclude(
                        DocServiceFilter.ofServiceName(
                            ServerReflectionGrpc.SERVICE_NAME,
                        ),
                    )
                    .build(),
            )
            .build()
    }
}


실행

'Back-end' 카테고리의 다른 글

[Redis] 나야 조회수  (3) 2024.10.15
[Redis] Redis 데이터 저장 근데 protobuf를 곁들인  (3) 2024.10.14
[gRPC] gRPC란  (3) 2024.10.02
[Spring/Thymeleaf] option 태그에 enum 동적으로 넣기  (0) 2024.08.10
[Redis] Cache 전략  (0) 2024.07.29


gRPC

gRPC(gRPC Remote Procedure Call)은 구글에서 만든 오픈 소스 고성능 원격 프로시저 호출(RPC) 프레임워크다. 

로드 밸런싱, 추적, 상태 검사 및 인증을 위한 플러그형 지원을 통해 데이터 센터 내부 및 데이터 센터 간 서비스를 효율적으로 연결할 수 있다. 또한 분산 컴퓨팅의 마지막 마일에서 장치, 모바일 애플리케이션 및 브라우저를 백엔드 서비스에 연결하는 데 적용할 수 있다.


gRPC에서 클라이언트 애플리케이션은 마치 로컬 객체인 것처럼 다른 머신의 서버 애플리케이션에서 메서드를 직접 호출할 수 있으므로 분산 애플리케이션과 서비스를 더 쉽게 만들 수 있다. 많은 RPC 시스템에서와 마찬가지로 gRPC는 서비스를 정의하고 매개변수와 반환 유형으로 원격으로 호출할 수 있는 메서드를 지정하는 아이디어를 기반으로 한다. 서버 측에서 서버는 이 인터페이스를 구현하고 클라이언트 호출을 처리하기 위해 gRPC 서버를 실행한다. 클라이언트 측에서 클라이언트는 서버와 동일한 메서드를 제공하는 Stub(일부 언어에서는 단순히 클라이언트라고 함)을 갖는다.

Proto Buffer (=protobuf)

기본적으로 gRPC는 프로토콜 버퍼를 사용한다. json과 같이 구조화된 데이터를 직렬화/역직렬화하여 주고 받기 위함이다. .proto 텍스트 파일을 생성하고 메세지로 구조화된다. 각 메세지는 필드라고 하는 k-v 형태의 논리적인 레코드로 구성된다.

message Person {
  string name = 1;
  int32 id = 2;
  bool has_ponycopter = 3;
}

데이터 구조를 지정했으면 프로토버프 컴파일러를 이용해 데이터 액세스 클래스를 생성한다. 

// The greeter service definition.
service Greeter {
  // Sends a greeting
  rpc SayHello (HelloRequest) returns (HelloReply) {}
}

// The request message containing the user's name.
message HelloRequest {
  string name = 1;
}

// The response message containing the greetings
message HelloReply {
  string message = 1;
}

프로토버프가 지원하는 언어는 다양하며 각 언어별로 protoc 패키지를 통해 해당 프로토파일을 바이트코드로 컴파일하게 되는데 나는 주로 protoc-java, protoc-kotlin을 이용해서 사용할 예정이다. 다양한 언어를 사용하는 Polyglot 환경에서는 특히 더 유용하다. api 스펙에 해당하는 proto파일을 가지고 각자의 환경에서 컴파일러가 generate한 클래스를 개발에 이용할 수 있으니 통일된 규격의 api를 만드는 것이 가능해진다. 또한 개발자들은 비즈니스 로직에 집중할 수 있게 되어 개발 생산성이 향상된다.

프로토콜 버퍼는 버전이 있는데 현재는 proto3 버전을 사용한다. 자세한 내용은 Protobuf Documentation을 참고한다.

gRPC는 쓰레드 기반이 아니라 이벤트 기반으로 동작해서 쓰레드가 죽기전까지 작업을 계속 할 수 있다. 그래서 Spring WebFlux, Coroutine 같은 Reactive 프로그래밍과도 잘 어울린다.

[Kafka] Kafka cli 명령어


Kafka Command 목록

$ cd confluent-7.1.2/bin/
$ ls
connect-distributed          kafka-features                      kafka-rest-stop                  ksql-run-class
connect-mirror-maker         kafka-get-offsets                   kafka-rest-stop-service          ksql-server-start
connect-standalone           kafka-json-schema-console-consumer  kafka-run-class                  ksql-server-stop
kafka-acls                   kafka-json-schema-console-producer  kafka-server-start               ksql-stop
kafka-avro-console-consumer  kafka-leader-election               kafka-server-stop                ksql-test-runner
kafka-avro-console-producer  kafka-log-dirs                      kafka-storage                    schema-registry-run-class
kafka-broker-api-versions    kafka-metadata-shell                kafka-streams-application-reset  schema-registry-start
kafka-cluster                kafka-mirror-maker                  kafka-topics                     schema-registry-stop
kafka-configs                kafka-preferred-replica-election    kafka-transactions               schema-registry-stop-service
kafka-console-consumer       kafka-producer-perf-test            kafka-verifiable-consumer        trogdor
kafka-console-producer       kafka-protobuf-console-consumer     kafka-verifiable-producer        windows
kafka-consumer-groups        kafka-protobuf-console-producer     ksql                             zookeeper-security-migration
kafka-consumer-perf-test     kafka-reassign-partitions           ksql-datagen                     zookeeper-server-start
kafka-delegation-tokens      kafka-replica-verification          ksql-migrations                  zookeeper-server-stop
kafka-delete-records         kafka-rest-run-class                ksql-print-metrics               zookeeper-shell
kafka-dump-log               kafka-rest-start                    ksql-restore-command-topic

kafka-topics

# topic 생성
$ kafka-topics --bootstrap-server localhost:9092 --create --topic test_topic_01
WARNING: Due to limitations in metric names, topics with a period ('.') or underscore ('_') could collide. 
To avoid issues it is best to use either, but not both. # topic name에 마침표나 언더스코어를 사용하면 Warning이 발생한다.
Created topic test_topic_01.

# 생성한 topic 확인
$ kafka-topics --bootstrap-server localhost:9092 --list
test_topic_01
welcome-topic # 저번에 만들어 둔 토픽

# topic 삭제
$ kafka-topics --bootstrap-server localhost:9092 --delete --topic test_topic_01

# 3개의 Partitions를 갖는 topic 생성 (설정을 주지 않으면 default partition은 1개 $KAFKA_HOME/etc/kafka/server.properties 안의 num.partitions=1)
$ kafka-topics --bootstrap-server localhost:9092 --create --topic test-topic-02 --partitions 3
Created topic test-topic-02.

# 생성한 topic 확인
$ kafka-topics --bootstrap-server localhost:9092 --describe --topic test-topic-02
Topic: test-topic-02    TopicId: pL4El2JiSWWueVQ-pOOCsw PartitionCount: 3       ReplicationFactor: 1    Configs: segment.bytes=1073741824
        Topic: test_topic_02    Partition: 0    Leader: 0       Replicas: 0     Isr: 0
        Topic: test_topic_02    Partition: 1    Leader: 0       Replicas: 0     Isr: 0
        Topic: test_topic_02    Partition: 2    Leader: 0       Replicas: 0     Isr: 0

# replication 을 만들어 본다.
$ kafka-topics --bootstrap-server localhost:9092 --create --topic test-topic-03 --partitions 3 --replication-factor 2
Error while executing topic command : Replication factor: 2 larger than available brokers: 1.
[2024-01-30 12:06:52,910] ERROR org.apache.kafka.common.errors.InvalidReplicationFactorException: Replication factor: 2 larger than available brokers: 1.
 (kafka.admin.TopicCommand$) # 현재 브로커가 1개이기 때문에 factor를 2개 이상 설정할 수 없다.

# 생성한 topic logs 파일 확인
$ cd ~/data/kafka-logs 
$ ls -l
total 32
-rw-r--r-- 1 root root    4 Jan 30 12:05 cleaner-offset-checkpoint
-rw-r--r-- 1 root root    4 Jan 30 12:12 log-start-offset-checkpoint
-rw-r--r-- 1 root root   88 Jan 30 11:53 meta.properties
-rw-r--r-- 1 root root   58 Jan 30 12:12 recovery-point-offset-checkpoint
-rw-r--r-- 1 root root   58 Jan 30 12:12 replication-offset-checkpoint
drwxr-xr-x 2 root root 4096 Jan 30 12:06 test-topic-02-0
drwxr-xr-x 2 root root 4096 Jan 30 12:06 test-topic-02-1
drwxr-xr-x 2 root root 4096 Jan 30 12:06 test-topic-02-2 # 3개의 partitions 설정해서 3개의 폴더가 생성

$ cd test-topic-02-2
$ ls -l
total 8
-rw-r--r-- 1 root root 10485760 Jan 30 12:06 00000000000000000000.index # 기본 segment 10mb
-rw-r--r-- 1 root root        0 Jan 30 12:06 00000000000000000000.log # 여기가 실제 저장되는 로그
-rw-r--r-- 1 root root 10485756 Jan 30 12:06 00000000000000000000.timeindex
-rw-r--r-- 1 root root        8 Jan 30 12:06 leader-epoch-checkpoint
-rw-r--r-- 1 root root       43 Jan 30 12:06 partition.metadata

kafka-console-producer

# 신규 토픽 생성 (있으면 지우고 해도 상관없음)
$ kafka-topics --bootstrap-server localhost:9092 --create --topic test-topic
Created topic test-topic.

# test-topic 토픽에 값 보내기 (실제로는 Selialize, Partitioning 절차를 거쳐 전달됨)
$ kafka-console-producer --bootstrap-server localhost:9092 --topic test-topic
>aaa
>bbb
>123 # 숫자도 문자열로 보내짐
>한글도 되나요 # 한글도 보내짐
>

# key message 구조로 보내고자 한다면 속성 추가
$ kafka-console-producer --bootstrap-server localhost:9092 --topic test-topic \
--property key.separator=: --property parse.key=true
>userId01:aaa
>userId02:bbb
>userId01:ccc
>userId02:ddd

kafka-console-consumer

$ kafka-console-consumer --bootstrap-server localhost:9092 --topic test-topic
# 아무것도 안나옴 (offset : latest)

$ kafka-console-consumer --bootstrap-server localhost:9092 --topic test-topic --from-beginning
aaa
bbb
123
한글도 되나요
# 실제로는 읽고 있으나 처음부터 읽게 하려면 --from-beginning 옵션을 줘야 earliest가 됨.

# key meesage 구조로 읽고자 한다면
$ kafka-console-consumer --bootstrap-server localhost:9092 --topic test-topic \
--property print.key=true --property print.value=true --from-beginning
userId01        aaa
userId02        bbb
userId01        ccc
userId02        ddd

여러 개의 Partition을 갖는 토픽

$ kafka-topics --bootstrap-server localhost:9092 --create --topic multipart-topic --partitions 3
Created topic multipart-topic.

# 확인
$ kafka-topics --bootstrap-server localhost:9092 --describe --topic multipart-topic
Topic: multipart-topic  TopicId: xZz_vjDISb65ojmEiJkF5g PartitionCount: 3       ReplicationFactor: 1    Configs: segment.bytes=1073741824
        Topic: multipart-topic  Partition: 0    Leader: 0       Replicas: 0     Isr: 0
        Topic: multipart-topic  Partition: 1    Leader: 0       Replicas: 0     Isr: 0
        Topic: multipart-topic  Partition: 2    Leader: 0       Replicas: 0     Isr: 0

# 프로듀스
$ kafka-console-producer --bootstrap-server localhost:9092 --topic multipart-topic
>aaa
>bbb
>ccc
>ddd

# 컨슘
 kafka-console-consumer --bootstrap-server localhost:9092 --topic multipart-topic --from-beginning
ccc
bbb
aaa
ddd # 이런식으로 순서가 보장되어 있지 않다.

# partition을 프린트 하도록 하면 같은 파티션 단위로 묶어서 읽어옴
$ kafka-console-consumer --bootstrap-server localhost:9092 --topic multipart-topic --from-beginning --property print.partition=true
Partition:2     ccc
Partition:0     bbb
Partition:0     ddd
Partition:1     aaa

# key를 가진 메세지 프로듀스
$ kafka-console-producer --bootstrap-server localhost:9092 --topic multipart-topic \
> --property key.separator=: --property parse.key=true
>1: aaa
>2: bbb
>3: ccc
>4: ddd
>5: eee
>6: fff
>1: kkk # 재할당
>2: bbbaaa

# key를 가진 메세지 컨슘
$ kafka-console-consumer --bootstrap-server localhost:9092 --topic multipart-topic --from-beginning --property print.key=true --property print.value=true --property print.partition=true
Partition:0     1        aaa
Partition:2     2        bbb
Partition:2     3        ccc
Partition:1     4        ddd
Partition:0     5        eee
Partition:1     6        fff
Partition:0     1        kkk # 동일한 key값을 가지면 동일한 partition으로 간다!
Partition:2     2        bbbaaa
<select name="resultStatus" class="form-control form-select  size11" id="result_status">
    <option value="WAITING" th:selected="${Result?.reportResultStatus?.name == 'WAITING'}">처리 접수</option>
    <option value="IN_PROGRESS" th:selected="${Result?.reportResultStatus?.name == 'IN_PROGRESS'}">처리중</option>
    <option value="INACTIVE" th:selected="${Result?.reportResultStatus?.name == 'INACTIVE'}">비활성화</option>
    <option value="REJECT" th:selected="${Result?.reportResultStatus?.name == 'REJECT'}">반려</option>
</select>

상태에 관련된 변수값을 enum으로 관리하는 것을 거의 필수라고 할 수 있다. 타임리프를 사용하다보면 option 태그안에 enum 값을 매핑해 보여줄 필요가 생기는데 보통 위처럼 작업을 했었다.

Result 라는 객체 안에 있는 enum 값은 아래와 같다.

enum class ReportResultStatus(val value: String) {
    WAITING("신고 접수"),
    IN_PROGRESS("처리중"),
    INACTIVE("비활성화"),
    REJECT("반려"),
}

그러나 enum의 name, value 값은 언제나 변경 될 가능성이 있으므로 view 단에서 하드코딩해서 다루는 것은 적절하지 않다고 생각이 들었다.

그래서 enum 값을 option 태그에 매핑하는 fragment를 생성하기로 했다.

<!-- /fragments/enumSelect.html -->
<!DOCTYPE html>
<html xmlns:th="http://www.thymeleaf.org">
<body>
<div th:fragment="enumOptions (enumClassName, selectedValue)">
    <option th:each="status : ${T(enumClassName).values()}"
            th:value="${status.name()}"
            th:text="${status.value}"
            th:selected="${status.name() == selectedValue?.name}">
    </option>
</div>
</body>
</html>
<select name="reportResultStatus" class="form-control form-select  size11" id="result_status">
    <div th:replace="layout/enum/enum_option :: enumOptions('ReportResultStatus', ${Result?.reportResultStatus})"></div>
</select>

여기서 T 연산자는 정적 메소드나 인스턴스에 접근하기 위한 스프링 표현법이다. 문제는 T 연산자를 통한 동적 문자열 삽입이나 fragment를 통한 다른 컨텍스에서의 접근이 안된다.. 그렇다고 매번 view단에서 저 코드를 반복 생성 하는 것도 원하지 않았다. 따라서 아래 방법처럼 구현을 했다.


<!-- /fragments/enumSelect.html -->
<!DOCTYPE html>
<html xmlns:th="http://www.thymeleaf.org">
<body>
<div th:fragment="enumOptions(enumClassName, selectedValue)">
    <!-- enumClassName에 따라 적절한 enum을 선택 -->
    <div th:with="enumValues=
            ${enumClassName == 'ReportResultStatus' ? T(com.minggu.enums.ReportResultStatus).values() :
              (enumClassName == 'AnotherEnumClass' ? T(com.minggu.enums.AnotherEnumClass).values() :
              null)}">

        <!-- 공통 처리 부분 -->
        <option th:each="status : ${enumValues}"
                th:value="${status.name()}"
                th:text="${status.value}"
                th:selected="${status.name() == selectedValue?.name}">
        </option>
    </div>
</div>
</body>
</html>
<div th:replace="layout/enum/enum_option :: enumOptions('ReportResultStatus', ${ReportResult?.reportResultStatus})"></div>

매번 enum 값을 명시해줘야 하긴 하지만 그나마 이렇게 작성하는게 중복코드를 줄이고 enum 값의 value, name이 변경되어도 안전하다.


<참고>

https://www.baeldung.com/thymeleaf-enums

'Back-end' 카테고리의 다른 글

[gRPC] Armeria + gRPC 띄워보기  (7) 2024.10.07
[gRPC] gRPC란  (3) 2024.10.02
[Redis] Cache 전략  (0) 2024.07.29
Redis의 분산락 사용에 대해서  (0) 2024.07.19
[C#] using 구문  (1) 2022.09.08

Pixar에서 만든 3D 포맷, USD


USD Repository : https://github.com/PixarAnimationStudios/USD
Document : https://graphics.pixar.com/usd/release/index.html


USDZ stands for Universal Scene Description. It is a file format for 3D models, introduced by Apple in collaboration with Pixar for its ARKit.

→ Apple과 Pixar가 ARKit을 위해 공동으로 만든 3d 모델 포맷입니다.


USD가 파일 포맷이며 해당 파일을 압축한 형태가 USDZ입니다. (단, 단순 패키징이 목적이고 압축을 하지 않는다고 합니다. 그래서 용량이 더 커질 수도 있다고...)

Interestingly, even though the USDZ file uses a zip file container to bring together all of its component files into one package, it does not allow currently for the zip compression feature to actually be enabled to make the file size smaller.

USD, USDZ가 이진코드인 것에 비해 USDA는 사람이 읽을 수 있게 텍스트 형태로 나타낸 것을 의미합니다. (ASCII 형식)


USD, USDZ라고 말하는 파일 형식은 iOS, macOS 등에서 별다른 모바일 앱 없이 실행시킬 수 있는 3d 모델 파일 포맷입니다. (현재 Android는 USDZ를 지원하지 않으며 이에 상응하는 gLTF 및 gLB가 있습니다.)

실제로 Shopify에서 USDZ파일을 포함한 3D모델링을 지원하고 있습니다. 또한 증강현실을 이용해 상품을 직접 원하는 위치에 배치해 볼 수 있습니다.

이는 단순 제품 상세이미지를 확인하는 용도 뿐 아니라 가전, 가구 등의 상품들을 직접 인테리어 배치 해 볼 수 있는 고객경험으로의 확장이 기대됩니다.


https://changelog.shopify.com/posts/support-for-usdz-3d-models-as-product-media
https://genovawebart.com/blog/implementing-3d-models-shopify


Apple에서 제공하는 샘플


<장점>

  1. 광밤위한 기능 지원
    3D models, scene hierarchy, materials, lighting, animations, bones, skinning, and blend shapes 등을 지원합니다. 

  2. 현대적인 기능
    바로 최고의 3D 애니메이션 스튜디오 Pixar에서 사용하기 때문에 USD에 대한 디자인 요구사항이 완벽하다고 합니다.

  3. 빠르다.
    USD 파일 형식이 바이너리 인코딩을 사용하기 때문에 읽고 쓰는 것이 빠릅니다.


<단점>

  1. 낮은 호환성
    Pixar 내에서는 완벽 호환되지만 외부에서는 Apple Software만 호환됩니다. 그것도 제한적으로.

  2. 큰 파일 크기
    Pixar는 지마켓처럼 데이터를 효율적으로 전송해야 하는 회사가 아닙니다. 파일용량보다 풍부한 시각 효과를 선호합니다.
    USD파일이 일반적으로 동등한 gITF 파일보다 더 큽니다.


<결론>

For most other applications, USDZ is not really the best file format choice–usually, glTF or FBX are more appropriate. 

→ 대부분의 어플리케이션에서는 gITF나 FBX를 사용하는 것이 바람직.

그러나! 상품의 상세이미지를 3D로 볼 수 있다는 점 외에도 별다른 플러그인 없이 AR을 이용해 실제 인테리어 배치를 해볼 수 있다는 점에서 충분히 매력 있는 포맷이라고 생각합니다. (단, iOS에서만.......)


<번외>

3d 상품이미지를 지원한다면 이런 모습일 것 같아요! (https://www.threekit.com/3d-product-library)

AR없이 USDZ를 웹에서 표현하고 싶다? → Model Viewer라는 것도 있어요! (https://modelviewer.dev/

크롬에서도 지원해주면 안 되나요..? (https://github.com/google/model-viewer/discussions/3298)

gITF to USD (https://github.com/google/usd_from_gltf)


<참조>

Should you use the USD and USDZ 3D file formats? (https://www.threekit.com/blog/should-you-use-the-usd-and-usdz-3d-file-formats)

USDZ를 Python으로 변환해보기! → What Is USDZ and How To Convert Your 3D Model to USDZ (https://anand2nigam.medium.com/what-is-usdz-and-how-to-convert-your-3d-model-to-usdz-dac2e6205036)

Everything You Need to Know About USDZ Files (https://www.marxentlabs.com/usdz-files/)


[Redis] Cache 전략

Cache Warming : 미리 DB 데이터를 cache에 말아두는 작업

캐싱지침

읽기 전략

  • Look Aside 패턴 → 캐시 미스 시 DB 조회
    • 원하는 데이터만 별도로 구성하여 캐시에 저장
    • DB와 캐시가 분리 가용되기 때문에 캐시 장애 대비 구성이 되어있음
    • Redis 다운시 순간적으로 DB로 부하가 몰릴 순 있음


  • Read Through 패턴 → 캐시 미스 시 DB 조회 후 캐시 업데이트 후 캐시를 읽음
    • DB와 캐시간 데이터 동기화가 항상 이루어져 데이터 정합성 보장
    • DB 동기화를 캐시 라이브러리에 위임
    • 데이터 조회 속도가 전체적으론 느림 (캐시 2번 조회하니)
    • Redis가 다운될 경우 서비스 이용 불가

쓰기 전략

  • Write Back 패턴 → 쓰기 작업 시에 캐시에 모아서 배치 작업을 통해 DB에 반영
    • Wirte가 빈번하면서 Read 하는 양이 많은 서비스에 적합 
    • 자주 사용되지 않는 불필요한 리소스가 저장됨
    • 캐시에서 오류 발생 시 데이터 영구 소실

  • Wirte Through 패턴
    • 데이터 일관성을 유지 할 수 있음. (유실되면 안되는 상황에 적합)
    • 자주 사용되지 않는 불필요한 리소스가 저장
    • 매 요청마다 두번의 Write 발생으로 빈번한 update 서비스에서 성능 이슈 발생


위의 두 쓰기 전략은 모두 불필요한 리소스가 저장 될 수 있으므로 TTL 설정을 통해 사용되지 않는 데이터를 삭제해야함 (expire 명령어)

  • Wirte Around 패턴
    • 모든 데이터는 DB에 저장(캐시 갱신안함)
    • 캐시 미스일때만 DB, 캐시 데이터 저장 → 그래서 캐시와 db 데이터가 다를 수 있으므로 TTL 짧게 가져가야함
    • Wirte Through보다 훨씬 빠름


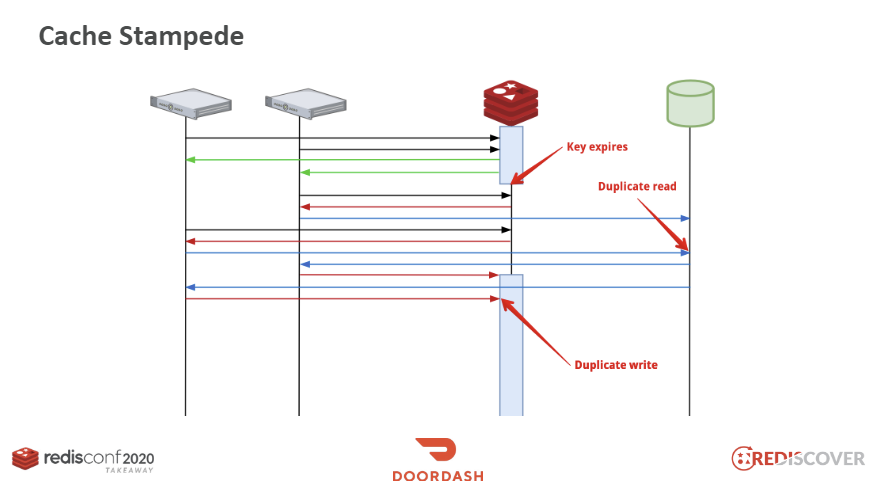
Cache Stampede : 캐시 키가 만료되는 순간과 조회 시점이 겹치게 될 때 모든 서버들이 DB가서 데이터를 질의하는 duplicate read 와 그 값을 반복적으로 redis에 write하는 duplcate write 가 발생

PER(Probablistic Early Recomputation) 알고리즘 도입으로 해결 → https://meetup.nhncloud.com/posts/251


레디스 활용 사례를 보면 좋아요시에 Redis에 적어놨다가 db에 배치하는 걸 추천


Cache를 Write-Through 하기 위한 방법 구현은 어떻게 될까?

Write-Through

  • 데이터 읽기 (Read):
    • 클라이언트가 데이터를 요청하면 먼저 Redis 캐시에서 데이터를 검색합니다.
    • 캐시에 데이터가 있으면 그 데이터를 반환합니다 (캐시 히트).
    • 캐시에 데이터가 없으면 (캐시 미스), 데이터베이스에서 데이터를 읽어오고, 그 데이터를 Redis 캐시에 저장한 후 클라이언트에 반환합니다.
  • 데이터 쓰기 (Write):
    • 클라이언트가 데이터를 업데이트하거나 삽입 요청을 하면, Redis 캐시와 데이터베이스에 동시에 데이터를 씁니다.
    • 데이터를 Redis 캐시에 쓰는 작업과 데이터베이스에 쓰는 작업을 동시에 수행하여 일관성을 유지합니다.

고려사항

  • 트랜잭션 관리:
    • 데이터베이스와 Redis 캐시에 동시에 쓰기를 수행하는 동안 오류가 발생할 수 있으므로, 트랜잭션 관리가 필요
    • Redis 트랜잭션과 데이터베이스 트랜잭션을 적절히 사용하여 데이터 일관성을 보장
  • 오류 처리:
    • 데이터베이스 쓰기 또는 Redis 쓰기 중 하나가 실패하는 경우 이를 처리하는 로직이 필요
    • 실패 시 재시도 메커니즘을 구현하거나, 로그를 기록하고 관리하는 방법을 고려
  • 성능 최적화:
    • 데이터베이스와 Redis에 동시에 쓰기를 수행하므로 쓰기 작업의 성능이 중요
    • 비동기 쓰기 또는 배치 처리와 같은 성능 최적화 기법을 고려
  • 데이터 일관성:
    • Redis와 데이터베이스 간의 데이터 일관성을 유지하기 위해 쓰기 작업의 순서를 보장해야 함
    • 분산 시스템 환경에서는 분산 트랜잭션 관리 기법을 사용할 수 있음 → Lettuce 스핀락 방식


Spring에서 구현할 때

  • Read는 @Cacheable  사용하면 됨. (캐시가 있으면 캐시를, 없으면 db조회)
  • Write 할 때는 @CachePut  어노테이션을 사용하면 될 듯

이런식으로...

@Service
class MyService(
    private val myEntityRepository: MyEntityRepository
) {

    @Cacheable(value = ["myCache"], key = "#key")
    fun readFromCache(key: String): String? {
        val entity = myEntityRepository.findById(key).orElse(null)
        return entity?.value
    }

    @CachePut(value = ["myCache"], key = "#key")
    @Transactional
    fun writeToCacheAndDb(key: String, value: String): String {
        val entity = MyEntity(key, value)
        myEntityRepository.save(entity)
        return value
    }

    @CacheEvict(value = ["myCache"], key = "#key")
    @Transactional
    fun deleteFromCacheAndDb(key: String) {
        myEntityRepository.deleteById(key)
    }
}


필터 별로 보여줘야 하는 리스트는 어떻게 캐싱해야 할까?

Sorted Sets

Redis의 Sorted Sets 데이터 구조를 사용하면 score를 기준으로 데이터가 자동 정렬된다. 그럼 포스트 생성 시간, 좋아요 수, 조회 수 등을 스코어로 사용할 수 있다. (우리가 필터별로 데이터를 말아 둘 필요가 없다는 것)

각 게시글의 상세 데이터는 hash로 저장한다. (K-V 형태)

정렬 기능은 posts_by_views , posts_by_likes  이런 식으로 Sorted Set을 만들어 사용할 수 있을 것 같다.

게시글 저장 시 각 기준에 맞는 점수로 Sorted Set에 추가.

zrevrange

게시글 ID를 최신 순으로 가져오고 해당 ID로 상세 정보를 Hash에서 조회한다. 

해당 명령어의 시작과 끝 인덱스를 조절해서 페이징 기능을 구현할 수 있다. ex) 페이지당 10개를 보여주려고 할 때 zrevrange("posts",0,9) 

@Service
class PostService @Autowired constructor(private val redissonClient: RedissonClient) {

    private val sortedSetKey = "posts:latest"

    fun addPost(post: Post) {
        val sortedSet: RSortedSet<Post> = redissonClient.getSortedSet(sortedSetKey)
        sortedSet.add(post)
    }

    fun getPosts(start: Int, count: Int): List<Post> {
        val sortedSet: RSortedSet<Post> = redissonClient.getSortedSet(sortedSetKey)
        return sortedSet.valueRange(start.toLong(), (start + count - 1).toLong()).toList()
    }
}

@RestController
class PostController(private val postService: PostService) {

    @GetMapping("/api/posts")
    fun getPosts(
        @RequestParam(defaultValue = "0") start: Int,
        @RequestParam(defaultValue = "10") count: Int
    ): List<Post> {
        return postService.getPosts(start, count)
    }
}


이러면 무한 스크롤 페이징 처리도 구현 가능

근데 다음페이지로 갈 때 Sorted Set에 데이터가 추가 되면 어떨까?


고유 식별자 기반 페이징

fun getPostsByCriteria(jedis: Jedis, criteria: String, lastId: String?, count: Int): List<String> {
    val sortedSetKey = when (criteria) {
        "likes" -> "posts:likes"
        "views" -> "posts:views"
        "purchases" -> "posts:purchases"
        "latest" -> "posts:latest"
        else -> throw IllegalArgumentException("Unknown criteria")
    }

    val sortedSet: RSortedSet<Post> = redissonClient.getSortedSet(sortedSetKey)
    val range = if (lastId == null) {
        sortedSet.valueRange(0, count.toLong())
    } else {
        val lastPost = sortedSet.get(lastId)
        sortedSet.valueRange(lastPost, count.toLong())
    }

    return range
}

lastId는 마지막 조회된 데이터 ID. 데이터 삽입 시에 ID를 기준으로 페이징을 조정할 수 있다.


스냅샷 기반 페이징

fun getPostsSnapshot(start: Int, count: Int): List<String> {
    // 스냅샷을 생성
    val snapshot = redissonClient.getSortedSet("posts:latest").toSortedSet()
    return snapshot.valueRange(start.toLong(), (start + count - 1).toLong()).toList()
}

데이터를 정렬한 상태의 스냅샷을 유지하고 해당 스냅샷 기반으로 페이징 수행 할 수 있다. 그러면 데이터 삽입 시에도 페이지 일관성 유지.

페이징 토큰 사용

fun getPostsWithToken(jedis: Jedis, criteria: String, pageToken: String?, count: Int): List<String> {
    val sortedSetKey = when (criteria) {
        "likes" -> "posts:likes"
        "views" -> "posts:views"
        "purchases" -> "posts:purchases"
        "latest" -> "posts:latest"
        else -> throw IllegalArgumentException("Unknown criteria")
    }

    val sortedSet: RSortedSet<Post> = redissonClient.getSortedSet(sortedSetKey)
    val range = if (pageToken == null) {
        sortedSet.valueRange(0, count.toLong())
    } else {
        val lastPost = sortedSet.get(pageToken)
        sortedSet.valueRange(lastPost, count.toLong())
    }

    return range.map { it.id }
}


pageToken
은 마지막으로 조회된 항목의 ID 또는 다른 고유 식별자. 사용자가 스크롤 할 때 마지막으로 조회된 항목을 기준으로 다음 항목 조회


하나의 스냅샷을 저장하여 사용자에게 제공

@Cacheable("posts-snapshot")
fun getPostsSnapshot(count: Int): List<Post> {
    val sortedSet: RSortedSet<Post> = redissonClient.getSortedSet("posts:latest")
    return sortedSet.valueRange(0, count.toLong()).toList()
}


서버에서 정렬된 결과의 스냅샷을 일정 시간동안 캐시해서 클라이언트에 제공.

데이터 일관성 유지 + 성능 최적화가 가능


<레퍼런스>

Redis pagination - 레디스에서 페이징 처리 / 페이징 처리 방법에 따른 고려사항 TPS

Redis 에 @Cacheable, @CachePut, @CacheEvict 적용해보기

[REDIS] 📚 캐시(Cache) 설계 전략 지침 💯 총정리

캐시 성능 향상기 (Improving Cache Speed at Scale) (nhn cloud)

Sorted Set Introduction (명령어)


[Spring/Kotlin] form data array 바인딩 실패

view에서 multipart를 첨부하려고 form 데이터를 보내다가 에러를 마주했다. 

{
    "hashtagText": "",
    "postTags[0].postTagSeq": "0",
    "postTags[0].atrcTagSeq": "1142",
    "postTags[0].checked": "false",
    "postTags[1].postTagSeq": "0",
    "postTags[1].atrcTagSeq": "1143",
    "postTags[1].checked": "false",
    "postTags[2].postTagSeq": "1020",
    "postTags[2].atrcTagSeq": "1144",
    "postTags[2].checked": "true",
    "postTags[3].postTagSeq": "1021",
    "postTags[3].atrcTagSeq": "1145",
    "postTags[3].checked": "true",
    "postTags[4].postTagSeq": "0",
    "postTags[4].atrcTagSeq": "1146",
    "postTags[4].checked": "false",
    "postTags[5].postTagSeq": "1022",
    "postTags[5].atrcTagSeq": "1147",
    "postTags[5].checked": "true",
    "postTitle": "숨이 막혀 메이데이~!~",
    "postText": "따따따따따",
    "attachment": []
}


백엔드에서 데이터를 받기 위한 DTO를 다음과 같이 설정했다.

data class postUpdateReq(
    @Schema(defaultValue = "상태", required = true) val status: Status,
    @Schema(description = "어드민 ID", required = true) var adminId: String?,
    @Schema(description = "포스트 태그") val postTags: List<postTagReq>?,
    @Schema(description = "첨부파일") val attachment: MultipartFile?,
)

data class postTagReq(
    @Schema(description = "포스트 태그 번호") val postTagSeq: Long,
    @Schema(description = "상위게시글 태그 번호") val upperPostTagSeq: Long,
    @Schema(description = "포스트 체크 여부") val checked: Boolean,
)

보면 알다시피 List DTO를 선언했다.

그리고 컨트롤러 단에는 평소에 많이 사용하는 @RequestBodty  대신 @ModelAttribute  로 매핑하였다.

@PutMapping("/{postSeq}")
    @Operation(summary = "포스트 수정", description = "포스트를 수정한다.")
    fun updatepost(
    	@PathVariable postSeq: Long,
        @ModelAttribute req: postUpdateReq
    ): BaseResponse<postDetailRes> {
...
}


이렇게 설정하면 된다고 생각하고 호출을 보냈는데 에러가 발생했다.

org.springframework.beans.InvalidPropertyException: Invalid property 'postTags[0]' of bean class [core.models.dto.postUpdateReq]: Illegal attempt to get property 'postTags' threw exception

Caused by: java.lang.IllegalStateException: Default value must not be null

default value가 null 이라니..?? 난 파라미터를 정확히 세팅해서 보냈는데 왜 null로 세팅이 됐을까.

@ModelAttribute  는 값을 객체로 바인딩할 때 프로퍼티 접근법을 사용한다. 프로퍼티 접근법에서는 해당 객체를 기본 생성자로 생성하고 setter를 사용하여 파라미터로 전달한 값을 객체에 주입한다.

코틀린 data class에서 val  로 선언하면 getter만 생성되고 setter가 생성되지 않는다. 그래서 바인딩이 되지 않았던 것이다.


data class postUpdateReq(
    @Schema(defaultValue = "상태", required = true) val status: Status,
    @Schema(description = "어드민 ID", required = true) var adminId: String?,
    @Schema(description = "포스트 태그") var postTags: List<postTagReq>?,
    @Schema(description = "첨부파일") val attachment: MultipartFile?,
)

그래서 위와 같이 라이드 태그를 var  로 선언하였으나 또 에러가 발생했다.

org.springframework.beans.NullValueInNestedPathException: Invalid property 'postTags' of bean class [core.models.dto.postUpdateReq]: Could not instantiate property type [core.models.dto.postTagReq] to auto-grow nested property path
 org.springframework.web.servlet.mvc.method.annotation.ServletModelAttributeMethodProcessor.bindRequestParameters(ServletModelAttributeMethodProcessor.java:167)
    at org.springframework.web.method.annotation.ModelAttributeMethodProcessor.resolveArgument(ModelAttributeMethodProcessor.java:153)
Caused by: java.lang.NoSuchMethodException: core.models.dto.postTagReq.<init>()
    at java.base/java.lang.Class.getConstructor0(Class.java:3761)
    at java.base/java.lang.Class.getDeclaredConstructor(Class.java:2930)
    at org.springframework.beans.AbstractNestablePropertyAccessor.newValue(AbstractNestablePropertyAccessor.java:925)
    ... 55 more


List로 들어갈 DTO의 기본생성자가 없기 때문이다. 그래서 아래와 같이 수정해야 한다.

data class postTagReq(
    @Schema(description = "포스트 태그 번호") val postTagSeq: Long = 0L,
    @Schema(description = "상위게시글 태그 번호") val upperPostTagSeq: Long = 0L,
    @Schema(description = "포스트 체크 여부") val checked: Boolean? = null,
)

아니면 constructor 를 선언해도 된다.


물론 multipart 파일은 @RequestPart 으로 세팅하고 dto를 @RequestBody  데이터를 보내는 방법도 있다.

그러면 form에 선언한 파라미터를 한꺼번에 보내지 못하고 자바스크립트 조작을 해야한다.

프론트에서 Content-type은 한가지만 설정할 수 있기 때문이다.

무엇보다 이 원인을 해결하지 못하고 우회하는 것 같아 사용하지 않았다.

Intro

  • Redis는 싱글 쓰레드로 동작하기 때문에 단일 노드로 구축해 사용해도 동시성 문제가 발생하지 않는다.
  • SPOF(Single Point Of Failure) : 단일 장애 지점
  • Replication : Master - Slave - Slave의 구조
  • Failover(장애조치) : 현재 마스터를 복제복으로 바꾸고 복제본을 마스터로 변경한다. 마스터에서 실행하는 것
  • Redis의 복제는 비동기식이기 때문에 상황에 따라 경합(race condition)이 발생할 수 있다. (키에 대한 쓰기가 복제본으로 전송되기 전 마스터 다운)
  • Race Condition(경쟁 상황) : 2개 이상의 프로세스가 동시에 같은 자원에 접근하여 read, write 하는 상황
  • 임계구역 : 둘 이상의 쓰레드가 접근해서는 안되는 공유 자원을 접근하는 코드의 일부. 임계 구역은 지정된 시간이 지난 후 종료되며 때문에 어떤 쓰레드가 임계 구역에 들어가고자 한다면 지정된 시간만큼 대기해야한다.
  • Distributed Lock(분산락) : 경쟁 상황이 발생했을 때 혹은 하나의 공유자원에 접근할 때 데이터에 결함이 발생하지 않도록 원자성을 보장하는 기법.
  • SET 명령어
    • NX(Not eXists) 옵션 : 키가 존재하지 않을 때만 SET
    • PX 옵션 : ms로 유효 시간 조정
    • SETNX(Set  if Not eXists) 명령어 : 키가 없는 경우에만 SET이 성공 
  • Lock : 공유 자원에 대한 동시 접근을 제어하는 매커니즘. 하나의 쓰레드만 해당 자원에 접근, 변경 할 수 있다.
    • 비관적 락은 읽기조차 불가능


RedLock 알고리즘

과반 수 이상의 노드에서 Lock을 획득했다면 Lock을 획득한 것으로 간주

분산환경에서 Redis가 권장하는 방법이다.

  1. 현재 시간을 ms 단위로 구한다.
  2. 순차적으로 N대의 Redis 서버에 잠금을 요청한다. 이 때 timeout은 Lock의 유효 시간 보다 훨씬 작은 시간을 쓴다. 만약 Lock의 유효 시간이 10초라면 각 Redis 서버에 잠금을 획득하기 위한 timeout은 5~50ms 이다. 이렇게 짧은 timeout을 사용해 장애가 발생한 Redis 서버와 통신에 많은 시간을 사용하지 않도록 방지할 수 있다.
  3. Redis 서버가 5대라고 가정할 때 과반수(3대) 이상의 서버로부터 Lock을 획득했고 Lock을 획득하기 위해 사용한 시간이 Lock의 유효 시간보다 작았다면 Lock을 획득했다고 간주한다. 즉 Lock의 유효시간이 10초인데 Lock을 얻기 위해 11초가 걸렸다면 실패한 것이다.
  4. Lock을 획득 한 후 유효시간은 처음 Lock의 유효시간 - Lock을 얻기 위해 걸린 시간이다. Lock의 유효 시간이 10초인데 획득에 3초가 걸렸다면 얻은 후부터 7초 뒤에 만료된다.
  5. Lock을 얻지 못했다면 모든 Redis 서버에게 Lock 해제 요청을 보낸다. 예를 들어 5대의 Redis 서버 중 한 대의 서버에게만 Lock 획득을 성공했다. 과반 수 이상의 Lock을 획득하지 못했으므로 Lock 획득에 실패했고 모든 Redis 서버에 Lock 해제 요청을 보낸다.

요약 → 

  • Client는 Lock을 획득하기 위해 모든 Redis 서버에게 Lock을 요청. 과반 수 이상의 Redis 서버에게 Lock을 획득하면 Lock을 획득
  • 실패했다면 모든 Redis 서버에게 Lock 해제를 요청하고 일정 시간 후에 Lock을 획득하기 위한 재 시도를 한다.

완벽하진 않음 

GC, 네트워크 지연, 타이밍 이슈로 깨질 수 있음


Lettuce

Redis의 java 구현체

SETNX 명령어와 같은 원자적 연산을 사용해 스핀락 기법으로 분산락을 구현해야한다.

  • Spin Lock :멀티 스레딩 환경에서 공유 자원에 대한 동시 접근을 방지 하기 위한 락 중 하나.
    다른 락과는 다르게, 락을 획득할 대까지 계속해서 락 획득을 시도하고 조건을 확인하면서 대기하는 기법.
    1. A스레드가 락을 획득하려고 시도
    2. 락이 이미 다른 스레드가 획득했다면 A스레드가 반복적으로 요청하면서 락 획득 시도
    3. 락이 해제되면 다음으로 먼저 요청한 스레드중 하나가 랜덤으로 락을 획득  

지속적으로 Retry 하기 때문에 성능 이슈가 발생한다.


Redisson

pub/sub 방식을 이용한다.

Lock이 해제될 때마다 subscribe 중인 클라이언트에게 "이제 락 획득을 시도해도 된다" 라는 알림을 보낸다.

따라서 클라이언트에서 락 획득을 실패했을 때 redis에 지속적으로 락 획득 요청을 보내는 과정이 사라지고 이에 따라 부하가 발생하지 않게 된다.

또 Ridesson은 RLock이라는 락을 위한 인터페이스를 제공함.

RLock rLock = redissonClient.getLock(lockName);

try {
  boolean available = rLock.tryLock(waitTime, leaseTime, timeUnit);
  
  if(!available){
    return false; //락 획득 실패
  }
  //락 획득 후 로직 수행
}catch (InterruptedException e){
  //락을 얻으려고 시도하다가 인터럽트를 받았을 때 발생하는 예외
}finally{
	try{
      rLock.unlock();
      log.info("unlock complete: {}", rLock.getName());
    }catch (IllegalMonitorStateException e){
      //이미 종료된 락일 때 발생하는 예외
    }
}


<참고>

[Redis] 레디스가 제공하는 분산락(RedLock)의 특징과 한계

Redis FAILOVER

Redis로 동시성 문제 해결하기

레디스를 활용한 분산 락(Distrubuted Lock) feat lettuce, redisson

풀필먼트 입고 서비스팀에서 분산락을 사용하는 방법 - Spring Redisson (마켓컬리)

Distributed Lock 구현 과정 (채널톡에서 Redisson pub/sub 사용)

[Kafka] Kafka 구성요소

Distributed Partitioned Immutable Log = Kafka


Topic

Partition으로 구성된 일련의 로그 파일 

  • RDBMS의 Partitioned Table과 유사한 기능
  • Topic은 Key-Value 형식의 메세지 구조이며, Value로 어떤 타입의 메세지도 가능(문자열, 숫자값, 객체, Json, Avro, Protobuf 등)
  • 로그 파일과 같이 연속적으로 추가, 발생하는 데이터를 저장하는 구조
  • 시간의 흐름에 따라 메시지가 순차적으로 물리적인 파일에 write 됨 (RDB처럼 Update 같은 개념이 없이 전부 Append한다. TSDB처럼)
  • 하나의 Topic은 1개 이상의 Partition을 가질 수 있다.


Partition

Topic의 partition은 kafka의 병렬 성능과 가용성 기능의 핵심 요소

메시지는 병렬 성능과 가용성을 고려한 topic 내의 개별 partition에 분산 저장됨.

또한 topic의 partition 들은 단일 kafka broker 뿐만 아니라 여러 개의 kafka broker 들에 분산 저장 됨.

두번째 Broker가 죽으면 첫번째 Broker의 Partition #1이 Follower에서 Leader가 되어 정합성 보장.

Offsets

개별 파티션은 정렬되고, 변경 할 수 없는(immutable) 일련의 레코드로 구성된 로그 메시지

  • 개별 레코드는 offset으로 불리는 일련 번호를 할당 받음
  • 개별 Partition은 다른 파티션과 완전히 독립적임
  • 개별 Partition 내에서 정렬되고 offset이 할당됨


Producer

Producers are clients that write events to Kafka. The producer specifies the topics they will write to and the producer controls how events are assigned to partitions within a topic. This can be done in a round-robin fashion for load balancing or it can be done according to some semantic partition function such as by the event key.

  • Producer는 Topic에 메세지를 보냄(메세지 write)
  • Producer는 성능 / 로드밸런싱 / 가용성 / 업무 정합성 등을 고려하여 어떤 브로커의 파티션으로 메세지를 보내야 할지 전략적으로 결정됨

Topic과 Value는 필수값으로 Broker에 value를 전달하면 Partition에 나누어 저장됨.

Consumer

Consumers are clients that read events from Kafka.

The only metadata retained on a per-consumer basis is the offset or position of that consumer in a topic. This offset is controlled by the consumer. Normally a consumer will advance its offset linearly as it reads records, however, because the position is controlled by the consumer it can consume records in any order. For example, a consumer can reset to an older offset to reprocess data from the past or skip ahead to the most recent record and start consuming from “now”.

This combination of features means that Kafka consumers can come and go without much impact on the cluster or on other consumers.

  • Consumer는 Topic에서 메세지를 읽어 들임.
  • 여러 개의 Consumer들로 구성 될 경우 어떤 브로커의 파티션에서 메세지를 읽어들일지 전략적으로 결정함


auto.offset.reset

Consumer가 Topic에 처음 접속하여 Message를 가져올 때 가장 오래된 처음 (Broker의 message) offset 부터(earliest) 가져올 것인지, 가장 최근인 마지막 offset 부터 가져올 것 인지를 설정하는 파라미터

  • auto.offset.reset = ealiest :  처음 offset 부터 읽음
  • auto.offset.reset = latest : 마지막 offset부터 읽음 (default)
  • kafka-console-consumer 명령어를 사용 할 때 --from-beginning을 사용해야만 auto.offset.reset이 earlist로 지정됨


Serializer/Deserializer

Producer → Broker로 Key,Value가 전송될 때 Serialize 되어 ByteArray로 전달 된다. 그리고 Broker → Consumer는 ByteArray를 Deserialize하여 key, value를 획득한다.

ByteArray를 사용하여 전송하면 네트워크 대역폭도 잘 사용할 수 있고 압축도 된다. 자바 코드에서는 아래처럼 적용한다.

Kafka에서 기본적으로 제공하는 Serializer는 StringSerializer, ShortSerializer, IntegerSerializer, LongSerializer, DoubleSerializer, BytesSerializer가 있다. (그러나 업무에선 Custom 만들어야 할 듯)


Partitioner

메세지는 Producer를 통해 전송시 Partitioner를 통해 토픽의 어떤 파티션으로 전송되어야 할 지 미리 결정됨.

메세지 Key는 업무 로직이나 메세지 Produce/Consume시 분산 성능 영향을 고려하여 생성

  • Key 값을 가지지 않는 경우,
    라운드 로빈, 스티키 파티션 등의 전략이 선택되어 파티션 별로 메세지가 전송 될 수 있음.
    → Topic이 여러 개의 파티션을 가질 때 메세지의 전송 순서가 보장되지 않은 채로 Consumer에서 읽혀질 수 있음.
    (전송 순서를 보장하려면 Partition을 하나로 가져야 하는데 그럼 분산시스템의 이점이 없어짐)
  • Key 값을 가지는 경우,
    특정 key값을 가지는 메세지는 특정 파티션으로 고정되어 전송됨.
    → 단일 파티션 내에서 전송 순서가 보장되어 Consumer에서 읽혀짐.

[Kafka] 설치 및 환경구축


Oracle VM이나 AWS freetier로 리눅스 서버를 생성한다.

환경구축이 되어있다면 바로 환경을 구축한다.


JDK 설치

java 11을 사용하려고 한다.

$ sudo apt-get install openjdk-11-jdk
...
$ java -version
openjdk version "11.0.20" 2023-07-18


Confluent Kafka 설치

kafka는 왜 Apache가 아니고 Confluent를 사용하느냐면 Confluent에는 ksqldb나 schema-registry 등 기본적으로 필요한 라이브러리가 포함되어 있고 admin UI가 존재한다.

Apache Kafka는 kafka core만 있어 따로 설치를 해야한다.

다운로드해서 sftp 이용해도 되지만 수고로우니 wget으로 서버 내에 다운로드하자.

$ cd ~ # home 으로 이동
$ sudo wget https://packages.confluent.io/archive/7.1/confluent-community-7.1.2.tar.gz?_ga=2.134073358.1620010104.1705371707-1047466751.1705371655&_gl=1*182lsyw*_ga*MTA0NzQ2Njc1MS4xNzA1MzcxNjU1*_ga_D2D3EGKSGD*MTcwNTM3MTY1NS4xLjEuMTcwNTM3MTgwMi42MC4wLjA.
$ sudo tar -xvf "/confluent/confluent-community-7.1.2.tar.gz?_ga=2.168151329.1620010104.1705371707-1047466751.1705371655"

환경 변수 설정

$ sudo vi ~/.bashrc
 
# 아래 2줄 추가 (confluent kafka 압축 해제한 폴더로)
export KAFKA_HOME=/home/tkbell/confluent-7.1.2
export PATH=.:$PATH:$KAFKA_HOME/bin
 
$ . .bashrc # 수정사항 반영
 
# 터미널 재시작 후 정상적으로 환경변수 등록 확인
$ echo $KAFKA_HOME
/home/tkbell/confluent-7.1.2
$ echo $PATH
.:/usr/local/sbin:/usr/local/bin:/usr/sbin:/usr/bin:/sbin:/bin:/usr/games:/usr/local/games:/snap/bin:/home/tkbell/confluent-7.1.2/bin

home/$user 경로는 현재 자신 서버에 맞게 설정하면 된다.


Kafka 실행

기동은 Zookeeper를 먼저 실행하고 Kafka를 실행한다.

$ cd $KAFKA_HOME/etc/kafka/ # 해당 경로에 properties 파일들이 존재. 여기서 zookeeper.properties 파일과 함께 올려서 실행시킨다.
 
$ zookeeper-server-start ./zookeeper.properties  mkdir: cannot create directory ‘/confluent/bin/../logs’: Permission denied # 아 sudo 안썼구나
[0.001s][error][logging] Error opening log file '/confluent/bin/../logs/zookeeper-gc.log': No such file or directory
[0.002s][error][logging] Initialization of output 'file=/confluent/bin/../logs/zookeeper-gc.log' using options 'filecount=10,filesize=100M' failed.
Invalid -Xlog option '-Xlog:gc*:file=/confluent/bin/../logs/zookeeper-gc.log:time,tags:filecount=10,filesize=100M', see error log for details.
Error: Could not create the Java Virtual Machine.
Error: A fatal exception has occurred. Program will exit.
 
$ sudo zookeeper-server-start ./zookeeper.properties
sudo: zookeeper-server-start: command not found # 아.....
 
# 그냥 쉘 스크립트를 실행하자....
$ sudo sh zookeeper-server-start $KAFKA_HOME/etc/kafka/zookeeper.properties

어차피 나중에 쉘로 실행할 거니까.. 일단 주키퍼 띄우고 그 상태에서 새 터미널을 띄워 kafka를 띄워보자.

$ cd $CONFLUENT_HOME
$ sudo sh kafka-server-start $KAFKA_HOME/etc/kafka/server.properties
 
...
[2024-01-16 12:07:57,039] INFO [KafkaServer id=0] started (kafka.server.KafkaServer)
[2024-01-16 12:07:57,189] INFO [BrokerToControllerChannelManager broker=0 name=alterIsr]: Recorded new controller, from now on will use broker ubuntu-20-minhalee.tkbell.gmarket.nh:9092 (id: 0 rack: null) (kafka.server.BrokerToControllerRequestThread)
[2024-01-16 12:07:57,213] INFO [BrokerToControllerChannelManager broker=0 name=forwarding]: Recorded new controller, from now on will use broker ubuntu-20-minhalee.tkbell.gmarket.nh:9092 (id: 0 rack: null) (kafka.server.BrokerToControllerRequestThread)


또 새 터미널을 띄워 topic을 만들어보자.

$ kafka-topics --bootstrap-server localhost:9092 --create --topic welcome-topic
Created topic welcome-topic.


종료할 때도 카프카를 먼저 죽이고 주키퍼를 죽이면 된다.

편하게 하게 위해서 일단 주키퍼 & 카프카 실행 쉘 스크립트를 만들어준다.

$ cd ~
$ sudo vi zoo_start.sh
sudo sh $KAFKA_HOME/bin/zookeeper-server-start $KAFKA_HOME/etc/kafka/zookeeper.properties
 
$ sudo vi kafka_start.sh
sudo sh $KAFKA_HOME/bin/kafka-server-start $KAFKA_HOME/etc/kafka/server.properties
 
$ sudo chmod +x *.sh # 누구나 실행할 수 있도록 권한 변경
 
$ ./zoo_start.sh
# 새 터미널 띄워서
$ ./kafka_start.sh

정상적으로 실행되면 완료!


로그 경로 변경

$ cd $KAFKA_HOME/etc/kafka
$ ls
connect-console-sink.properties    connect-mirror-maker.properties  server.properties
connect-console-source.properties  connect-standalone.properties    tools-log4j.properties
connect-distributed.properties     consumer.properties              trogdor.conf
connect-file-sink.properties       kraft                            zookeeper.properties
connect-file-source.properties     log4j.properties
connect-log4j.properties           producer.properties
$ sudo vi server.properties
 
...
# A comma separated list of directories under which to store log files
log.dirs=/home/tkbell/data/kafka-logs
...
 
$ sudo vi zookeeper.properties
 
...
dataDir=/home/tkbell/data/zookeeper
...

Virtual Box를 이용해서 kafka 테스트를 진행한다면 tmp 경로가 날아가니까 다른 데로 변경해야 하는데 Tinker 사용한다면 딱히 바꿀 필요는 없다.

그래도 운영서버에 구축한다면 주로 로그를 많이 봐야 하므로 zookeeper와 kafka의 로그 경로를 home으로 변경해 준다. 

카프카의 환경설정 파일은 server.properties 이고 Zookeeper의 환경 설정 파일은 zookeeper.properties 이다.


정상적으로 로그가 남는지 확인해 본다.

$ cd
$ kafka-topics --bootstrap-server localhost:9092 --create --topic welcome-topic # 신규 토픽 생성
Created topic welcome-topic.
$ cd ./data/kafka-logs/
$ ls
cleaner-offset-checkpoint    meta.properties                   replication-offset-checkpoint
log-start-offset-checkpoint  recovery-point-offset-checkpoint  welcome-topic-0

welcome-topic-0이라는 이름으로 토픽이 생성되었다. 파티션 단위로 로그가 생겨나는 것을 확인할 수 있다.


[MongoDB] MongoDB Tool 이용한 접속

저번 포스팅에 mongoDB를 Docker로 설치하여 접속해 봤다.

mongod.conf 파일에서 bindIp 속성의 값을 허용 ip대역으로 설정하면 외부에서도 접속할 수 있다.


MongoDB Compass(GUI)


Try MongoDB Tools - Download Free Here

Free download for MongoDB tools to do more with your database. MongoDB Shell, Compass, CLI for Cloud, BI Connector and other database tools available.

www.mongodb.com

공식 홈페이지에서 제공하는 무료 GUI 툴이다.

접속 정보를 입력하고 저장 & 연결하면 접속이 된다.

역시 GUI가 편하다.. 손쉽게 데이터를 추가하거나 import 할 수 있는 구조이다. 별다른 설명서가 없어도 조작하는데 어려움이 없다.


MongoDB Shell(CLI)

압축 파일을 받아서 열기만 하면 mongosh.exe를 이용해 쉽게 쉘을 실행시킬 수 있다.

일일이 해당 파일을 실행해서 접속하기는 매우 귀찮으니까 Windows 기준으로 환경 변수 설정을 해준다.

시스템 환경 변수 편집으로 들어가 '환경 변수'를 클릭해 준다.

사용자 변수던 시스템 변수던 Path 변수를 선택해 편집을 눌러준다.

방금 설치한 mongoDB Shell의 위치 폴더 경로를 입력해 준다.

그리고 시스템 재부팅하거나 cmd 열어서 set 명령어 입력해 준다.

작업 표시줄에 있는 터미널 속성 들어가 준 다음에 고급에 관리자권한 실행 체크


mongosh 명령어를 이용해 접속정보와 DB, -u 유저, -p 비밀번호를 입력하면 접속이 된다.

+ Recent posts