[Kotlin] Firebase 연동 & Realtime Database 조작
너무 Java만 쓰는 것 같아서 오랜만에 Kotlin으로 작업..!
사실 글 하나를 올리더라도 Java와 Kotlin 두 개의 코드를 올릴 수 있겠지만..
요새 이것저것 많이 하고 있는 와중에 포스팅에 생각보다 많은 시간이 들어서 쉽지가 않다...
우는 소리 말고 부지런히 해보자! 다 성장을 위한 거니까
Realtime Database는 Google Firebase에서 제공하는 database의 한 종류이다.
Firestore의 이전 버전이라고 할 수 있다. 둘을 비교해놓은 글들을 읽어보면 대충 Firesotre가 최신 버전이고 price policy가 다르다 정도로 압축되는 것 같은데 구체적으로 어떤 기능이 다르고, 가격정책이 어떻게 다른지는 소개하지 않을 것이다.
Realtime Database가 구버전이라고 해도 충분히 활용할 수 있기 때문에 연동하는 샘플을 만들어보자. Kotlin으로 작성도 해보고!
https://minggu92.tistory.com/75
[Android] firebase 연동 (최신버전)
[Android] firebase 연동 오랜만에 돌아온 안드로이드 시간. 원래는 블로그를 내가 자주 잊을 수 있는 안드로이드 위주로만 올리려고 하다가.. 웹 개발 쪽 이것저것 올리다 보니 소홀해졌었다. 따라서
minggu92.tistory.com
https://minggu92.tistory.com/80
[Android / Java] Cloud Firestore 연동을 통한 Data 조작(feat. RecyclerView)
[Android / Java] Cloud Firestore 연동을 통한 Data 조작(feat. RecyclerView) Cloud Firestore는 Firebase 및 Google Cloud의 모바일, 웹, 서버 개발에 사용되는 유연하고 확장 가능한 데이터베이스입..
minggu92.tistory.com
java로 작성된 이전 글을 참조해보는 것도 좋겠다.
1. Firebase & Realtime Database 연동
1.1) Firebase 새 프로젝트 생성

1.2) Android project 생성
build.gradle(Project)
// Top-level build file where you can add configuration options common to all sub-projects/modules.
plugins {
    id 'com.android.application' version '7.1.2' apply false
    id 'com.android.library' version '7.1.2' apply false
    id 'org.jetbrains.kotlin.android' version '1.6.10' apply false
    //구글서비스 추가
    id 'com.google.gms.google-services' version '4.3.10' apply false
}

task clean(type: Delete) {
    delete rootProject.buildDir
}
build.gradle(App)
plugins {
    id 'com.android.application'
    id 'org.jetbrains.kotlin.android'
    id 'com.google.gms.google-services' //구글서비스 추가
}

android {
    compileSdk 32

    defaultConfig {
        applicationId "com.example.realtime_sample"
        minSdk 21
        targetSdk 32
        versionCode 1
        versionName "1.0"

        testInstrumentationRunner "androidx.test.runner.AndroidJUnitRunner"
    }

    buildTypes {
        release {
            minifyEnabled false
            proguardFiles getDefaultProguardFile('proguard-android-optimize.txt'), 'proguard-rules.pro'
        }
    }
    compileOptions {
        sourceCompatibility JavaVersion.VERSION_1_8
        targetCompatibility JavaVersion.VERSION_1_8
    }
    kotlinOptions {
        jvmTarget = '1.8'
    }

    //뷰 바인딩추가
    buildFeatures {
        viewBinding true
    }
}

dependencies {

    implementation 'androidx.core:core-ktx:1.7.0'
    implementation 'androidx.appcompat:appcompat:1.4.1'
    implementation 'com.google.android.material:material:1.5.0'
    implementation 'androidx.constraintlayout:constraintlayout:2.1.3'
    testImplementation 'junit:junit:4.13.2'
    androidTestImplementation 'androidx.test.ext:junit:1.1.3'
    androidTestImplementation 'androidx.test.espresso:espresso-core:3.4.0'

    // Import the Firebase BoM
    implementation platform('com.google.firebase:firebase-bom:29.2.1')

    // Declare the dependencies for any other desired Firebase products
    // For example, declare the dependencies for Firebase Authentication and Cloud Firestore
    implementation 'com.google.firebase:firebase-auth-ktx'
    implementation 'com.google.firebase:firebase-database-ktx'

    implementation 'com.google.code.gson:gson:2.9.0'
}
GSON 모듈도 import 시켜주자
1.3) Android 앱에 Firebase 추가
SHA1 (gradle.signingReport)


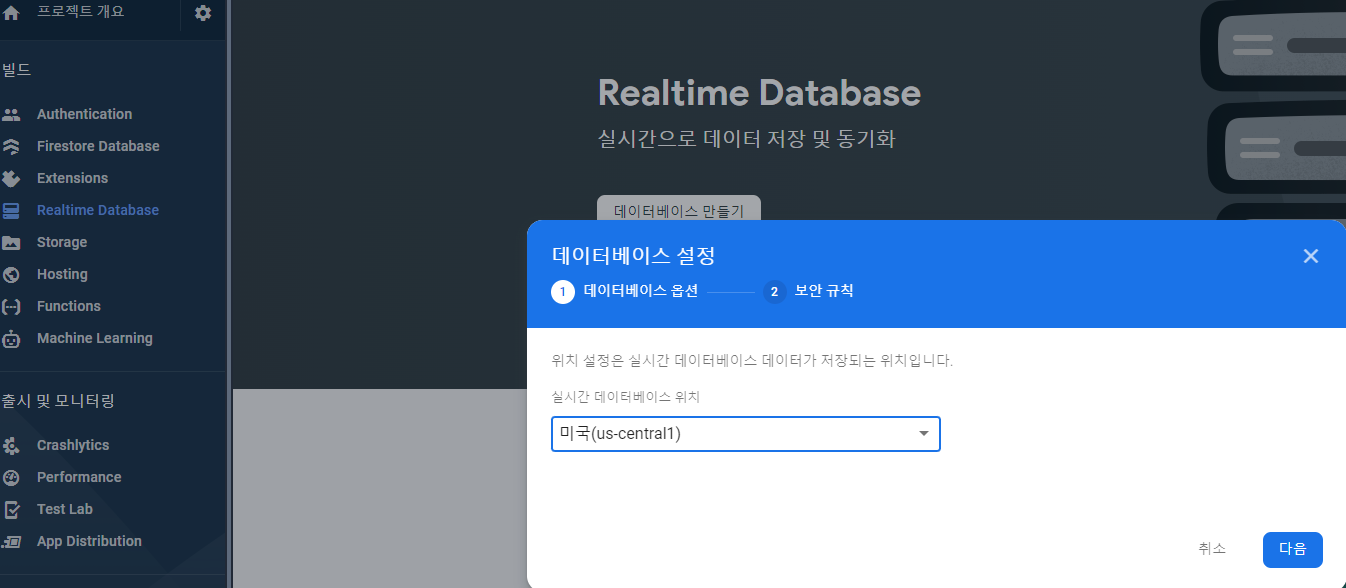
1.4) 새 데이터베이스 생성


규칙은 일단 true로 설정해주자.
2. Layout
저번과 같이 RecyclerVIew를 이용해보자.
2.1) activity_main.xml
<?xml version="1.0" encoding="utf-8"?>
<androidx.appcompat.widget.LinearLayoutCompat xmlns:android="http://schemas.android.com/apk/res/android"
    xmlns:tools="http://schemas.android.com/tools"
    android:layout_width="match_parent"
    android:layout_height="match_parent"
    android:orientation="vertical"
    tools:context=".MainActivity">

    <androidx.appcompat.widget.LinearLayoutCompat
        android:layout_width="match_parent"
        android:layout_height="wrap_content"
        android:orientation="horizontal">

        <Button
            android:id="@+id/btn_write"
            android:layout_width="wrap_content"
            android:layout_height="wrap_content"
            android:layout_margin="10dp"
            android:layout_weight="1"
            android:text="유저 추가" />

        <Button
            android:id="@+id/btn_reload"
            android:layout_width="wrap_content"
            android:layout_height="wrap_content"
            android:layout_margin="10dp"
            android:layout_weight="1"
            android:text="새로고침" />

        <Button
            android:id="@+id/btn_delete"
            android:layout_width="wrap_content"
            android:layout_height="wrap_content"
            android:layout_margin="10dp"
            android:layout_weight="1"
            android:text="유저 삭제" />

    </androidx.appcompat.widget.LinearLayoutCompat>

    <androidx.recyclerview.widget.RecyclerView
        android:id="@+id/rv_user_list"
        android:layout_width="match_parent"
        android:layout_height="match_parent" />

</androidx.appcompat.widget.LinearLayoutCompat>
2.2) rv_layout.xml
<?xml version="1.0" encoding="utf-8"?>
<androidx.cardview.widget.CardView xmlns:android="http://schemas.android.com/apk/res/android"
    xmlns:app="http://schemas.android.com/apk/res-auto"
    android:layout_width="match_parent"
    android:layout_height="wrap_content"
    android:layout_margin="4dp"
    app:cardCornerRadius="8dp">

    <androidx.appcompat.widget.LinearLayoutCompat
        android:layout_width="match_parent"
        android:layout_height="wrap_content"
        android:orientation="horizontal">


        <TextView
            android:id="@+id/tv_name"
            android:layout_width="wrap_content"
            android:layout_height="wrap_content"
            android:layout_margin="10dp"
            android:layout_weight="1"
            android:text="Name" />

        <TextView
            android:id="@+id/tv_address"
            android:layout_width="wrap_content"
            android:layout_height="wrap_content"
            android:layout_margin="10dp"
            android:layout_weight="1"
            android:text="Address" />

        <TextView
            android:id="@+id/tv_age"
            android:layout_width="wrap_content"
            android:layout_height="wrap_content"
            android:layout_margin="10dp"
            android:layout_weight="1"
            android:text="Age" />
    </androidx.appcompat.widget.LinearLayoutCompat>

</androidx.cardview.widget.CardView>
2.3) string.xml
<resources>
    <string name="app_name">RealtimeDatabaseSample</string>
    <string name="add">추가</string>
    <string name="cancel">취소</string>
</resources>
3. Kotlin 소스 만들기
3.1) User.kt
import com.google.firebase.database.IgnoreExtraProperties

@IgnoreExtraProperties
data class User(val name: String? = null, val address: String? = null, val age: Int? = null) {
    // Null default values create a no-argument default constructor, which is needed
    // for deserialization from a DataSnapshot.
}
3.2) UserAdapter.kt
import android.view.LayoutInflater
import android.view.View
import android.view.ViewGroup
import android.widget.TextView
import androidx.recyclerview.widget.RecyclerView

class UserAdapter(val userList: ArrayList<User>): RecyclerView.Adapter<UserAdapter.ViewHolder>() {
    override fun onCreateViewHolder(parent: ViewGroup, viewType: Int): ViewHolder {
        val view = LayoutInflater.from(parent.context).inflate(R.layout.rv_layout, parent, false)
        return ViewHolder(view)
    }

    override fun onBindViewHolder(holder: ViewHolder, position: Int) {
        holder.name.text = userList[position].name
        holder.address.text = userList[position].address
        holder.age.text = userList[position].age.toString()
    }

    override fun getItemCount(): Int {
        return userList.size
    }

    class ViewHolder(itemView: View) : RecyclerView.ViewHolder(itemView) {
        val name: TextView = itemView.findViewById(R.id.tv_name)
        val address: TextView = itemView.findViewById(R.id.tv_address)
        val age: TextView = itemView.findViewById(R.id.tv_age)
    }
}
3.3) MainActivity.kt
import android.annotation.SuppressLint
import android.app.AlertDialog
import android.os.Bundle
import android.util.Log
import android.view.View
import android.widget.EditText
import android.widget.LinearLayout
import android.widget.TextView
import android.widget.Toast
import androidx.appcompat.app.AppCompatActivity
import androidx.recyclerview.widget.LinearLayoutManager
import com.example.realtimedatabasesample.databinding.ActivityMainBinding
import com.google.firebase.database.*
import com.google.firebase.database.ktx.database
import com.google.firebase.database.ktx.getValue
import com.google.firebase.ktx.Firebase
import com.google.gson.Gson


class MainActivity : AppCompatActivity() {
    companion object {
        private const val TAG = "MainActivity"
    }

    private lateinit var binding : ActivityMainBinding
    private lateinit var database : DatabaseReference
    private var drUser: DatabaseReference? = null

    val db = FirebaseDatabase.getInstance()
    val userList = arrayListOf<User>()
    val adapter = UserAdapter(userList)


    @SuppressLint("NotifyDataSetChanged")
    override fun onCreate(savedInstanceState: Bundle?) {
        super.onCreate(savedInstanceState)
        binding = ActivityMainBinding.inflate(layoutInflater)
        val view = binding.root
        setContentView(view)

        binding.rvUserList.layoutManager = LinearLayoutManager(this, LinearLayoutManager.VERTICAL, false)
        binding.rvUserList.adapter = adapter

        database = Firebase.database.reference //DatabaseReference

        /* 유저 읽기 */
        binding.btnReload.setOnClickListener(View.OnClickListener {
            database.child("users").get().addOnSuccessListener {

                // 1. 데이터 1회 읽어 RecyclerView에 담기
                /*
                userList.clear()
                for(userValue in it.children){
                    //jsonObject -> ModelClass by Gson
                    val user = Gson().fromJson(userValue.value.toString(), User::class.java)
                    userList.add(user)
                }
                adapter.notifyDataSetChanged()
                Toast.makeText(this, "유저 읽기 성공", Toast.LENGTH_SHORT).show()
                Log.i(TAG, "Got value ${it.value}")
                */
                // 2. 데이터 변화 감지하는 ValueEventListener add
                addUserListener(database)

            }.addOnFailureListener {
                Toast.makeText(this, "유저 읽기 실패", Toast.LENGTH_SHORT).show()
                Log.w(TAG, "Error getting data! $it")
            }
        })

        /* 유저 추가 */
        binding.btnWrite.setOnClickListener(View.OnClickListener {
            //동적으로 AlertDialog 생성
            val builder = AlertDialog.Builder(this)
            val tvName = TextView(this)
            val tvAddress = TextView(this)
            val tvAge = TextView(this)
            tvName.text = "Name"
            tvAddress.text = "Address"
            tvAge.text = "Age"

            val etName = EditText(this)
            val etAddress = EditText(this)
            val etAge = EditText(this)
            etAddress.isSingleLine = true

            val layout = LinearLayout(this)
            layout.orientation = LinearLayout.VERTICAL
            layout.setPadding(16, 16, 16, 16)
            layout.addView(tvName)
            layout.addView(etName)
            layout.addView(tvAge)
            layout.addView(etAge)
            layout.addView(tvAddress)
            layout.addView(etAddress)

            builder.setView(layout)
                .setTitle("유저 추가")
                .setPositiveButton(R.string.add) { _, _ ->
                    val user = hashMapOf(
                        "name" to etName.text.toString(),
                        "address" to etAddress.text.toString(),
                        "age" to etAge.text.toString().toLong().toInt()
                    )
                    database.child("users").push().setValue(user)
                        .addOnSuccessListener {
                            Toast.makeText(this, "유저 추가 성공", Toast.LENGTH_SHORT).show()
                        }
                        .addOnFailureListener {
                            Toast.makeText(this, "유저 추가 실패", Toast.LENGTH_SHORT).show()
                            Log.w(TAG, "error! $it")
                        }

//                    binding.btnReload.callOnClick() //새로고침 버튼 클릭
                }
                .setNegativeButton(R.string.cancel) { _, _ -> }
                .show()
        })

        /* 유저 삭제 */
        binding.btnDelete.setOnClickListener(View.OnClickListener {
            database.child("users").removeValue().addOnSuccessListener {
                Toast.makeText(this, "유저 삭제 완료", Toast.LENGTH_SHORT).show()
            }.addOnFailureListener {
                Toast.makeText(this, "유저 삭제 실패", Toast.LENGTH_SHORT).show()
            }
            adapter.notifyDataSetChanged()
        })

    }

    fun basicReadWrite() {
        // [START write_message]
        // Write a message to the database
        val database = Firebase.database
        val myRef = database.getReference("message")

        myRef.setValue("Hello, World!")
        // [END write_message]

        // [START read_message]
        // Read from the database
        myRef.addValueEventListener(object : ValueEventListener {
            override fun onDataChange(dataSnapshot: DataSnapshot) {
                // This method is called once with the initial value and again
                // whenever data at this location is updated.
                val value = dataSnapshot.getValue<String>()
                Log.d(TAG, "Value is: $value")
            }

            override fun onCancelled(error: DatabaseError) {
                // Failed to read value
                Log.w(TAG, "Failed to read value.", error.toException())
            }
        })
        // [END read_message]
    }

    private fun addUserListener(userDataReference: DatabaseReference){
        val userListener = object : ValueEventListener {
            @SuppressLint("NotifyDataSetChanged")
            override fun onDataChange(dataSnapshot: DataSnapshot) {
                if(dataSnapshot.hasChild("users")){
                    userList.clear()

                    for ( userValue in dataSnapshot.child("users").children){
                        val user = Gson().fromJson(userValue.value.toString(), User::class.java)
                        userList.add(user)
                    }

                    adapter.notifyDataSetChanged()
                }
            }

            override fun onCancelled(databaseError: DatabaseError) {
                // Getting Post failed, log a message
                Log.w(TAG, "loadUsers:onCancelled", databaseError.toException())
            }
        }
        userDataReference.addValueEventListener(userListener)
    }

}
4.Realtime Database 조작
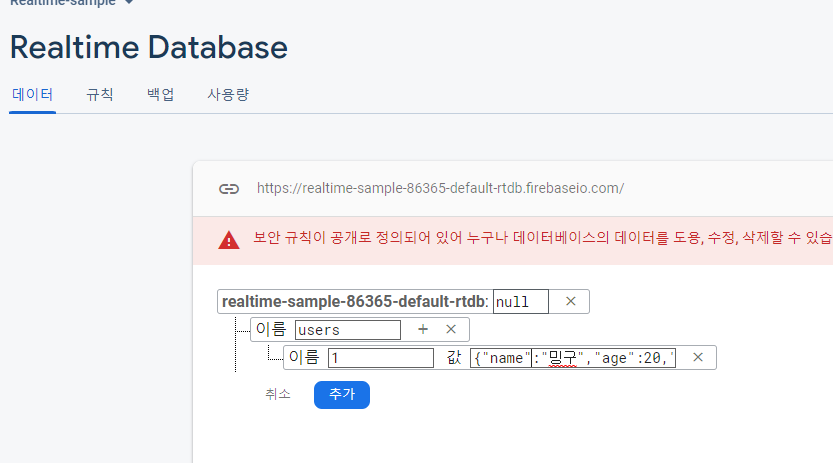
4.1) 새 데이터 생성


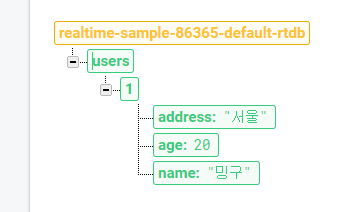
Firestore은 NoSQL 기반 Document 형식으로 되어있는데 Realtime Database는 Json형태로 되어있다.
샘플데이터를 먼저 만들어두자.
4.2) 데이터 읽기
/* 유저 읽기 */
binding.btnReload.setOnClickListener(View.OnClickListener {
    database.child("users").get().addOnSuccessListener {
        userList.clear()
        for(json in it.children){
            //jsonObject -> ModelClass by Gson
            val user = Gson().fromJson(json.value.toString(), User::class.java)
            userList.add(user)
        }
        adapter.notifyDataSetChanged()
        Toast.makeText(this, "유저 읽기 성공", Toast.LENGTH_SHORT).show()
        Log.i(TAG, "Got value ${it.value}")
    }.addOnFailureListener {
        Toast.makeText(this, "유저 읽기 실패", Toast.LENGTH_SHORT).show()
        Log.w(TAG, "Error getting data! $it")
    }
})
Json 데이터를 다뤄야 하다 보니까 Gson 라이브러리를 import 시켜놨다.
4.3) 데이터 쓰기
/* 유저 추가 */
binding.btnWrite.setOnClickListener(View.OnClickListener {
    //동적으로 AlertDialog 생성
    val builder = AlertDialog.Builder(this)
    val tvName = TextView(this)
    val tvAddress = TextView(this)
    val tvAge = TextView(this)
    tvName.text = "Name"
    tvAddress.text = "Address"
    tvAge.text = "Age"

    val etName = EditText(this)
    val etAddress = EditText(this)
    val etAge = EditText(this)
    etAddress.isSingleLine = true

    val layout = LinearLayout(this)
    layout.orientation = LinearLayout.VERTICAL
    layout.setPadding(16, 16, 16, 16)
    layout.addView(tvName)
    layout.addView(etName)
    layout.addView(tvAge)
    layout.addView(etAge)
    layout.addView(tvAddress)
    layout.addView(etAddress)

    builder.setView(layout)
        .setTitle("유저 추가")
        .setPositiveButton(R.string.add) { _, _ ->
            val user = hashMapOf(
                "name" to etName.text.toString(),
                "address" to etAddress.text.toString(),
                "age" to etAge.text.toString().toLong().toInt()
            )
            database.child("users").push().setValue(user)
                .addOnSuccessListener {
                    Toast.makeText(this, "유저 추가 성공", Toast.LENGTH_SHORT).show()
                }
                .addOnFailureListener {
                    Toast.makeText(this, "유저 추가 실패", Toast.LENGTH_SHORT).show()
                    Log.w(TAG, "error! $it")
                }

            binding.btnReload.callOnClick() //새로고침 버튼 클릭
        }
        .setNegativeButton(R.string.cancel) { _, _ -> }
        .show()
})
데이터를 쓰고 나서 읽어오기 위해 새로고침 버튼을 클릭하는데 Realtime Database에서는 ValueEventListener를 통해 데이터 변화를 실시간으로 감지할 수 있다.
4.4) 데이터 변화 감지
ValueEventListener를 통해 데이터의 변화를 실시간 감지할 수 있다.
전체 children도 가능하고 특정 child도 가능하다.
	...
	/* 유저 읽기 */
    binding.btnReload.setOnClickListener(View.OnClickListener {
        database.child("users").get().addOnSuccessListener {

            // 1. 데이터 1회 읽어 RecyclerView에 담기
            /*
            userList.clear()
            for(userValue in it.children){
                //jsonObject -> ModelClass by Gson
                val user = Gson().fromJson(userValue.value.toString(), User::class.java)
                userList.add(user)
            }
            adapter.notifyDataSetChanged()
            Toast.makeText(this, "유저 읽기 성공", Toast.LENGTH_SHORT).show()
            Log.i(TAG, "Got value ${it.value}")
            */
            // 2. 데이터 변화 감지하는 ValueEventListener add
            addUserListener(database)

        }.addOnFailureListener {
            Toast.makeText(this, "유저 읽기 실패", Toast.LENGTH_SHORT).show()
            Log.w(TAG, "Error getting data! $it")
        }
    })

    ...

    private fun addUserListener(userDataReference: DatabaseReference){
        val userListener = object : ValueEventListener {
            @SuppressLint("NotifyDataSetChanged")
            override fun onDataChange(dataSnapshot: DataSnapshot) {
                if(dataSnapshot.hasChild("users")){
                    userList.clear()

                    for ( userValue in dataSnapshot.child("users").children){
                        val user = Gson().fromJson(userValue.value.toString(), User::class.java)
                        userList.add(user)
                    }

                    adapter.notifyDataSetChanged()
                }
            }

            override fun onCancelled(databaseError: DatabaseError) {
                // Getting Post failed, log a message
                Log.w(TAG, "loadUsers:onCancelled", databaseError.toException())
            }
        }
        userDataReference.addValueEventListener(userListener)
    }
3.5) 데이터 업데이트 및 삭제

/* 유저 삭제 */
binding.btnDelete.setOnClickListener(View.OnClickListener {
    database.child("users").removeValue().addOnSuccessListener {
        Toast.makeText(this, "유저 삭제 완료", Toast.LENGTH_SHORT).show()
    }.addOnFailureListener {
        Toast.makeText(this, "유저 삭제 실패", Toast.LENGTH_SHORT).show()
    }
    adapter.notifyDataSetChanged()
})
해보니까..별거 아니네!!!! (주말 이틀날림)
https://github.com/minha9012/Realtime-database-sample
GitHub - minha9012/Realtime-database-sample: Realtime Database CRUD sample by Kotlin
Realtime Database CRUD sample by Kotlin. Contribute to minha9012/Realtime-database-sample development by creating an account on GitHub.
github.com
<참고>
https://firebase.google.com/docs/database/android/read-and-write?authuser=0#kotlin+ktx
Android에서 데이터 읽기 및 쓰기 | Firebase Documentation
Join Firebase at Google I/O online May 11-12, 2022. Register now 의견 보내기 Android에서 데이터 읽기 및 쓰기 이 문서에서는 Firebase 데이터를 읽고 쓰는 기초적인 방법을 설명합니다. Firebase 데이터는 FirebaseDataba
firebase.google.com
'Andorid' 카테고리의 다른 글
| [Kotlin] Android OutOfMemoryError (0) | 2022.08.27 |
|---|---|
| [Kotlin] Local Storage에 logcat파일 만들기 (0) | 2022.08.25 |
| [Android / Java] Cloud Firestore 연동을 통한 Data 조작(feat. RecyclerView) (0) | 2022.03.27 |
| [Android] wifi를 통한 무선 디버깅(ADB) (0) | 2022.03.24 |
| [Android] android studio - github 연동 (0) | 2022.03.23 |