[Android / Java] Cloud Firestore 연동을 통한 Data 조작(feat. RecyclerView)
Cloud Firestore는 Firebase 및 Google Cloud의 모바일, 웹, 서버 개발에 사용되는 유연하고 확장 가능한 데이터베이스입니다. Firebase 실시간 데이터베이스와 마찬가지로 실시간 리스너를 통해 클라이언트 애플리케이션 간에 데이터의 동기화를 유지하고 모바일 및 웹에 대한 오프라인 지원을 제공해 네트워크 지연 시간이나 인터넷 연결에 상관없이 원활하게 반응하는 앱을 개발할 수 있습니다. Cloud Firestore는 Cloud Functions를 비롯한 다른 Firebase 및 Google Cloud 제품과도 원활하게 통합됩니다. -구글
자자 안드로이드 할 거면 파이어 스토어는 구축해봐야겠지.
공식문서와 함께 firestore을 구축해보자. 물론 하단엔 sample github도 첨부하겠다.
https://github.com/minha9012/Firestore-sample
이번 포스팅에서 처음 사용해본 기술
1. Cloud Firestore
2. RecyclerView
3. ViewBinding
1. Firebase 프로젝트 생성
저번에 만든 firebase sample앱에서 이어서 만들어서 따라 해도 된다. 그게 더 편하겠지만 나는 새 프로젝트를 생성해서 작업해보겠다. firebase 프로젝트 생성 및 연동은 아래 글을 참조하자.
https://minggu92.tistory.com/75
[Android] firebase 연동 (최신버전)
[Android] firebase 연동 오랜만에 돌아온 안드로이드 시간. 원래는 블로그를 내가 자주 잊을 수 있는 안드로이드 위주로만 올리려고 하다가.. 웹 개발 쪽 이것저것 올리다 보니 소홀해졌었다. 따라서
minggu92.tistory.com
2. Gradle 추가
2.1) module 수준 Gradle
// Top-level build file where you can add configuration options common to all sub-projects/modules.
plugins {
    id 'com.android.application' version '7.1.2' apply false
    id 'com.android.library' version '7.1.2' apply false
    //구글 서비스 추가
    id 'com.google.gms.google-services' version '4.3.10' apply false
}

task clean(type: Delete) {
    delete rootProject.buildDir
}
2.2) app 수준 Gradle
plugins {
    id 'com.android.application'
    id 'com.google.gms.google-services' //구글서비스 추가
}

android {
    compileSdk 32

    defaultConfig {
        applicationId "com.example.firestore_sample"
        minSdk 21
        targetSdk 32
        versionCode 1
        versionName "1.0"

        testInstrumentationRunner "androidx.test.runner.AndroidJUnitRunner"
    }

    buildTypes {
        release {
            minifyEnabled false
            proguardFiles getDefaultProguardFile('proguard-android-optimize.txt'), 'proguard-rules.pro'
        }
    }
    compileOptions {
        sourceCompatibility JavaVersion.VERSION_1_8
        targetCompatibility JavaVersion.VERSION_1_8
    }

    buildFeatures {
        viewBinding = true
    }
}

dependencies {

    implementation 'androidx.appcompat:appcompat:1.4.1'
    implementation 'com.google.android.material:material:1.5.0'
    implementation 'androidx.constraintlayout:constraintlayout:2.1.3'
    testImplementation 'junit:junit:4.13.2'
    androidTestImplementation 'androidx.test.ext:junit:1.1.3'
    androidTestImplementation 'androidx.test.espresso:espresso-core:3.4.0'

    // Import the BoM for the Firebase platform
    implementation platform('com.google.firebase:firebase-bom:29.2.1')

    // Declare the dependency for the Cloud Firestore library
    // When using the BoM, you don't specify versions in Firebase library dependencies
    implementation 'com.google.firebase:firebase-firestore'
}
추가할 건 별로 없다.
3. Firestore 컬렉션 추가
Cloud Firestore는 NoSQL 문서 중심의 데이터베이스입니다. SQL 데이터베이스와 달리 테이블이나 행이 없으며, 컬렉션으로 정리되는 문서에 데이터를 저장합니다.
각 문서에는 키-값 쌍이 들어 있습니다. Cloud Firestore는 작은 문서가 많이 모인 컬렉션을 저장하는 데 최적화되어 있습니다.
모든 문서는 컬렉션에 저장되어야 합니다. 문서는 하위 컬렉션 및 중첩 객체를 포함할 수 있으며, 둘 다 문자열 같은 기본형 필드나 목록 같은 복합 객체를 포함할 수 있습니다.
컬렉션과 문서는 Cloud Firestore에서 암시적으로 생성됩니다. 사용자는 컬렉션 내의 문서에 데이터를 할당하기만 하면 됩니다. 컬렉션 또는 문서가 없으면 Cloud Firestore에서 자동으로 생성합니다.
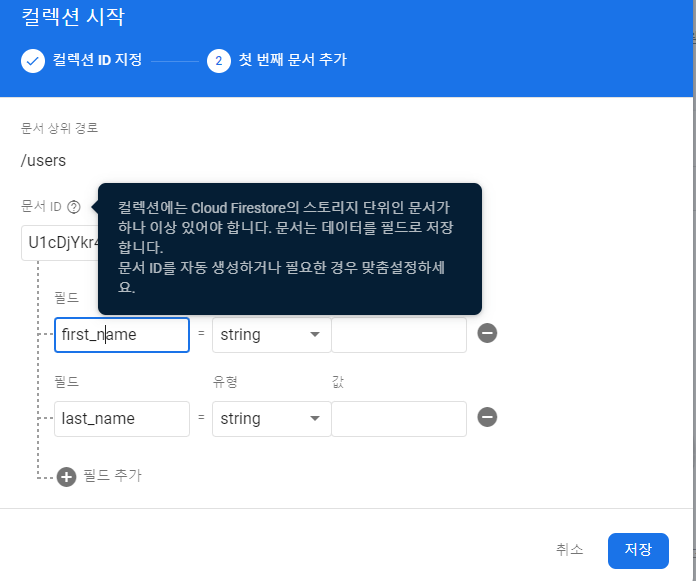
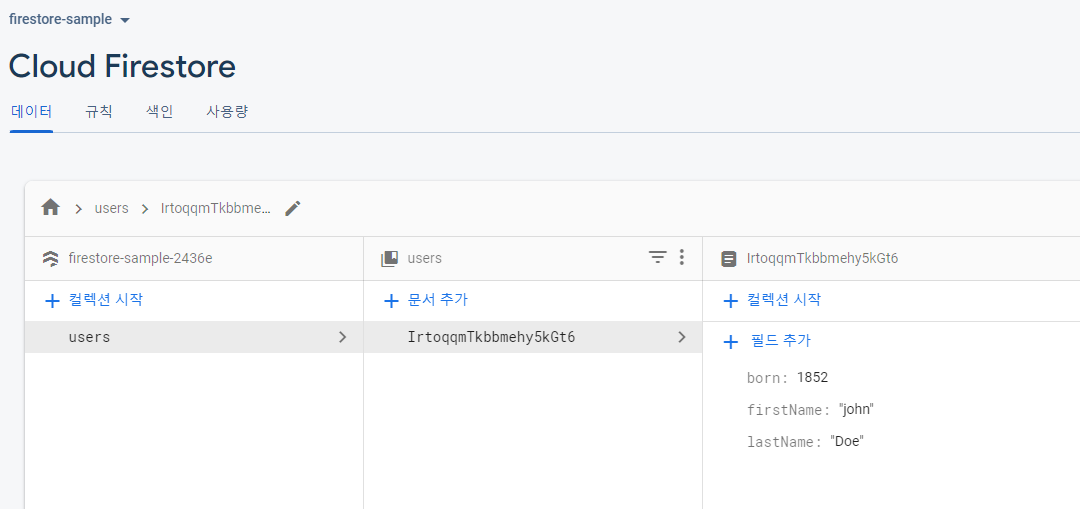
Firestore Instance를 앱 내에 선언하고 명시적으로 Collection과 Documentation을 추가해 줄 수도 있고 FIrebase콘솔에서 생성해 줄 수도 있다고 하는데 일단 우리는 콘솔에서 새 Collection을 하나 만들어보자.

서버는 eastasia를 선택했다.

컬렉션 시작을 눌러주고


별다른 설명 없이도 너무나 쉽다..
4. Layout 그리기
단순 데이터를 조작하는 것도 좋지만 뷰를 띄워서 실제로 동작하는 것을 보면 더더욱 공부가 될 테니 간단하게나마 Recycler View의 Layout을 그려보도록 하자.
4.1) activity_main.xml
<?xml version="1.0" encoding="utf-8"?>
<androidx.appcompat.widget.LinearLayoutCompat
    xmlns:android="http://schemas.android.com/apk/res/android"
    xmlns:app="http://schemas.android.com/apk/res-auto"
    xmlns:tools="http://schemas.android.com/tools"
    android:layout_width="match_parent"
    android:layout_height="match_parent"
    android:orientation="vertical"
    tools:context=".MainActivity">

    <androidx.appcompat.widget.LinearLayoutCompat
        android:layout_width="match_parent"
        android:layout_height="wrap_content"
        android:orientation="horizontal">

        <Button
            android:id="@+id/btn_write"
            android:layout_width="wrap_content"
            android:layout_height="wrap_content"
            android:layout_weight="1"
            android:layout_margin="10dp"
            android:text="유저 추가"/>


        <Button
            android:id="@+id/btn_reload"
            android:layout_width="wrap_content"
            android:layout_height="wrap_content"
            android:layout_weight="1"
            android:layout_margin="10dp"
            android:text="새로고침" />

        <Button
            android:id="@+id/btn_delete"
            android:layout_width="wrap_content"
            android:layout_height="wrap_content"
            android:layout_margin="10dp"
            android:layout_weight="1"
            android:text="유저 삭제" />
    </androidx.appcompat.widget.LinearLayoutCompat>

    <androidx.recyclerview.widget.RecyclerView
        android:id="@+id/rv_user_list"
        android:layout_width="match_parent"
        android:layout_height="match_parent" />

</androidx.appcompat.widget.LinearLayoutCompat>
4.2) rv_layout.xml
<?xml version="1.0" encoding="utf-8"?>
<androidx.cardview.widget.CardView xmlns:android="http://schemas.android.com/apk/res/android"
    xmlns:app="http://schemas.android.com/apk/res-auto"
    android:layout_width="match_parent"
    android:layout_height="wrap_content"
    android:layout_margin="4dp"
    app:cardCornerRadius="8dp">

    <androidx.appcompat.widget.LinearLayoutCompat
        android:layout_width="match_parent"
        android:layout_height="wrap_content"
        android:orientation="horizontal">


        <TextView
            android:id="@+id/tv_first_name"
            android:layout_width="wrap_content"
            android:layout_height="wrap_content"
            android:layout_margin="10dp"
            android:layout_weight="1"
            android:text="firstName" />

        <TextView
            android:id="@+id/tv_last_name"
            android:layout_width="wrap_content"
            android:layout_height="wrap_content"
            android:layout_margin="10dp"
            android:layout_weight="1"
            android:text="LastName" />

        <TextView
            android:id="@+id/tv_born"
            android:layout_width="wrap_content"
            android:layout_height="wrap_content"
            android:layout_margin="10dp"
            android:layout_weight="1"
            android:text="Born" />
    </androidx.appcompat.widget.LinearLayoutCompat>

</androidx.cardview.widget.CardView>
5. Java 소스 만들기
5.1) UserModel.java
package com.example.firestore_sample;

public class UserModel {

    String firstName;
    String lastName;
    int born;

    public String getFirstName() {
        return firstName;
    }

    public void setFirstName(String firstName) {
        this.firstName = firstName;
    }

    public String getLastName() {
        return lastName;
    }

    public void setLastName(String lastName) {
        this.lastName = lastName;
    }

    public int getBorn() {
        return born;
    }

    public void setBorn(int born) {
        this.born = born;
    }
}
5.2) userRecyclerViewAdapter.java
package com.example.firestore_sample;

import android.annotation.SuppressLint;
import android.content.Context;
import android.view.LayoutInflater;
import android.view.View;
import android.view.ViewGroup;
import android.widget.TextView;

import androidx.annotation.NonNull;
import androidx.recyclerview.widget.RecyclerView;

import java.util.ArrayList;

public class userRecyclerViewAdapter extends RecyclerView.Adapter<RecyclerView.ViewHolder> {
    String TAG = "userRecyclerViewAdapter";

    ArrayList<UserModel> userModels;

    public userRecyclerViewAdapter(ArrayList<UserModel> userModels) {
        this.userModels = userModels;
    }

    @NonNull
    @Override
    public RecyclerView.ViewHolder onCreateViewHolder(@NonNull ViewGroup parent, int viewType) {
        //자신이 만든 itemview를 inflate한 다음 뷰홀더 생성
        View view = LayoutInflater.from(parent.getContext()).inflate(R.layout.rv_layout, parent, false);
        //생선된 뷰홀더를 리턴하여 onBindViewHolder에 전달한다.
        return new ViewHolder(view);
    }

    @SuppressLint("SetTextI18n")
    @Override
    public void onBindViewHolder(@NonNull RecyclerView.ViewHolder holder, int position) {
        ViewHolder viewHolder = (ViewHolder) holder;
        viewHolder.tvFirstName.setText(userModels.get(position).getFirstName());
        viewHolder.tvLastName.setText(userModels.get(position).getLastName());
        viewHolder.tvBorn.setText( Integer.toString(userModels.get(position).getBorn()));
    }

    @Override
    public int getItemCount() {
        return userModels.size();
    }

    class ViewHolder extends RecyclerView.ViewHolder {
        TextView tvFirstName;
        TextView tvLastName;
        TextView tvBorn;

        public ViewHolder(@NonNull View itemView) {
            super(itemView);
            tvFirstName = itemView.findViewById(R.id.tv_first_name);
            tvLastName = itemView.findViewById(R.id.tv_last_name);
            tvBorn = itemView.findViewById(R.id.tv_born);
        }
    }
}
5.3) MainActivity.java
package com.example.firestore_sample;

import androidx.annotation.NonNull;
import androidx.appcompat.app.AppCompatActivity;
import androidx.recyclerview.widget.LinearLayoutManager;
import androidx.recyclerview.widget.RecyclerView;

import android.annotation.SuppressLint;
import android.app.AlertDialog;
import android.content.DialogInterface;
import android.os.Bundle;
import android.util.Log;
import android.widget.EditText;
import android.widget.LinearLayout;
import android.widget.TextView;
import android.widget.Toast;

import com.example.firestore_sample.databinding.ActivityMainBinding;
import com.google.android.gms.tasks.OnFailureListener;
import com.google.android.gms.tasks.OnSuccessListener;
import com.google.firebase.firestore.DocumentReference;
import com.google.firebase.firestore.FirebaseFirestore;
import com.google.firebase.firestore.QueryDocumentSnapshot;
import com.google.firebase.firestore.QuerySnapshot;
import com.google.firebase.firestore.auth.User;
import com.google.firebase.firestore.model.Document;

import java.util.ArrayList;
import java.util.HashMap;
import java.util.Map;

public class MainActivity extends AppCompatActivity {

    private static final String TAG = "MainActivity";

    userRecyclerViewAdapter adapter; //리싸이클러 뷰 어댑터
    RecyclerView recyclerView; //리싸이클러 뷰
    ArrayList<UserModel> userList = new ArrayList<>();
    FirebaseFirestore db = FirebaseFirestore.getInstance(); // Access a Cloud Firestore instance from your Activity

    @SuppressLint("NotifyDataSetChanged")
    @Override
    protected void onCreate(Bundle savedInstanceState) {
        super.onCreate(savedInstanceState);
        ActivityMainBinding binding = ActivityMainBinding.inflate(getLayoutInflater());
        setContentView(binding.getRoot());

        adapter = new userRecyclerViewAdapter(userList); //initialize Adapter

        binding.rvUserList.setLayoutManager(new LinearLayoutManager(this, LinearLayoutManager.VERTICAL, false));
        binding.rvUserList.setAdapter(adapter);
        binding.btnReload.setOnClickListener(view -> { //새로고침 버튼
            db.collection("users")
                    .get()
                    .addOnSuccessListener(e -> {
                        userList.clear();
                        for (QueryDocumentSnapshot document : e) {
                            UserModel user = new UserModel((String) document.get("firstName")
                                    , (String) document.get("lastName")
                                    , (Long) document.get("born")
                            );
                            userList.add(user);
                        }
                        adapter.notifyDataSetChanged();
                        Toast.makeText(this, "유저 데이터 로드 성공", Toast.LENGTH_SHORT).show();
                    })
                    .addOnFailureListener(exception -> {
                        Toast.makeText(this, "데이터 로드 실패", Toast.LENGTH_SHORT).show();
                        Log.w(TAG, "error! " + exception);
                    });
        });

        binding.btnWrite.setOnClickListener(view -> { //유저 등록
            //동적으로 AlertDialog 생성
            AlertDialog.Builder builder = new AlertDialog.Builder(this);

            TextView tvFirstName = new TextView(this);
            TextView tvLastName = new TextView(this);
            TextView tvBorn = new TextView(this);
            tvFirstName.setText("firstName");
            tvLastName.setText("lastName");
            tvBorn.setText("born");

            EditText etFirstName = new EditText(this);
            EditText etLastName = new EditText(this);
            EditText etBorn = new EditText(this);
            etFirstName.setSingleLine(true);
            etLastName.setSingleLine(true);

            LinearLayout layout = new LinearLayout(this);
            layout.setOrientation(LinearLayout.VERTICAL);
            layout.setPadding(16, 16, 16, 16);
            layout.addView(tvFirstName);
            layout.addView(etFirstName);
            layout.addView(tvLastName);
            layout.addView(etLastName);
            layout.addView(tvBorn);
            layout.addView(etBorn);

            builder.setView(layout)
                    .setTitle("유저 추가")
                    .setPositiveButton(R.string.add, (dialogInterface, i) -> {
                        UserModel user = new UserModel(etFirstName.getText().toString()
                                , etLastName.getText().toString()
                                , Long.parseLong(etBorn.getText().toString())
                        );

                        db.collection("users")
                                .add(user)
                                .addOnSuccessListener(e -> {
                                    Toast.makeText(this, "유저 추가 성공", Toast.LENGTH_SHORT).show();
                                })
                                .addOnFailureListener(exception -> {
                                    Toast.makeText(this, "유저 추가 실패", Toast.LENGTH_SHORT).show();
                                    Log.w(TAG, "error! " + exception);
                                });

                        binding.btnReload.callOnClick(); //새로고침 버튼 클릭

                    })
                    .setNegativeButton(R.string.cancel, (dialogInterface, i) -> {

                    })
                    .show();
        });

        binding.btnDelete.setOnClickListener(view -> { //유저삭제
            db.collection("user")
                    .document()
                    .delete()
                    .addOnSuccessListener(e -> {
                        binding.btnReload.callOnClick(); //새로고침 버튼 클릭
                        Toast.makeText(this, "유저 삭제 성공", Toast.LENGTH_SHORT).show();
                    })
                    .addOnFailureListener(exception -> {
                        Toast.makeText(this, "유저 삭제 실패", Toast.LENGTH_SHORT).show();
                        Log.w(TAG, "error! " + exception);
                    });
        });

    }

}
메인 액티비티부터 공개했다. 자세한 내용은 아래를 따라서
6. Data 조작
5.1) Cloud Firebase Instance 초기화
// Access a Cloud Firestore instance from your Activity
Firestore firestore = new Firestore(FirebaseFirestore.getInstance());
5.2) Data 추가
Cloud Firestore는 컬렉션에 저장되는 문서에 데이터를 저장합니다. 문서에 데이터를 처음 추가할 때 Cloud Firestore에서 암시적으로 컬렉션과 문서를 만듭니다. 컬렉션이나 문서를 명시적으로 만들 필요가 없습니다.
다음 예시 코드를 사용해 새 컬렉션과 문서를 만듭니다.
// Add a new document with a generated ID
// 새 컬렉션과 문서 추가
db.collection("users")
        .add(user)
        .addOnSuccessListener(documentReference -> Log.d(TAG, "DocumentSnapshot added with ID: " + documentReference.getId()))
        .addOnFailureListener(e -> Log.w(TAG, "Error adding document", e));

//하위 컬렉션의 메시지에 대한 참조를 만들 수 있습니다.
DocumentReference messageRef = db
        .collection("rooms").document("roomA")
        .collection("messages").document("message1");


//난 다음과 같이 구현했다.
db.collection("users")
        .add(user)
        .addOnSuccessListener(e -> {
            Toast.makeText(this, "유저 추가 성공", Toast.LENGTH_SHORT).show();
        })
        .addOnFailureListener(exception -> {
            Toast.makeText(this, "유저 추가 실패", Toast.LENGTH_SHORT).show();
            Log.w(TAG, "error! " + exception);
        });
혹은 유저를 추가하는 함수를 만들 수도 있겠다.
5.3) Data 읽기
db.collection("users")
        .get()
        .addOnCompleteListener(task -> {
            if (task.isSuccessful()) {
                for (QueryDocumentSnapshot document : task.getResult()) {
                    Log.d(TAG, document.getId() + " => " + document.getData());
                }
            } else {
                Log.w(TAG, "Error getting documents.", task.getException());
            }
        });

//난 이렇게 구현했다.
db.collection("users")
        .get()
        .addOnSuccessListener(e -> {
            userList.clear();
            for (QueryDocumentSnapshot document : e) {
                UserModel user = new UserModel((String) document.get("firstName")
                        , (String) document.get("lastName")
                        , (Long) document.get("born")
                );
                userList.add(user);
            }
            adapter.notifyDataSetChanged();
            Toast.makeText(this, "유저 데이터 로드 성공", Toast.LENGTH_SHORT).show();
        })
        .addOnFailureListener(exception -> {
            Toast.makeText(this, "데이터 로드 실패", Toast.LENGTH_SHORT).show();
            Log.w(TAG, "error! " + exception);
        });
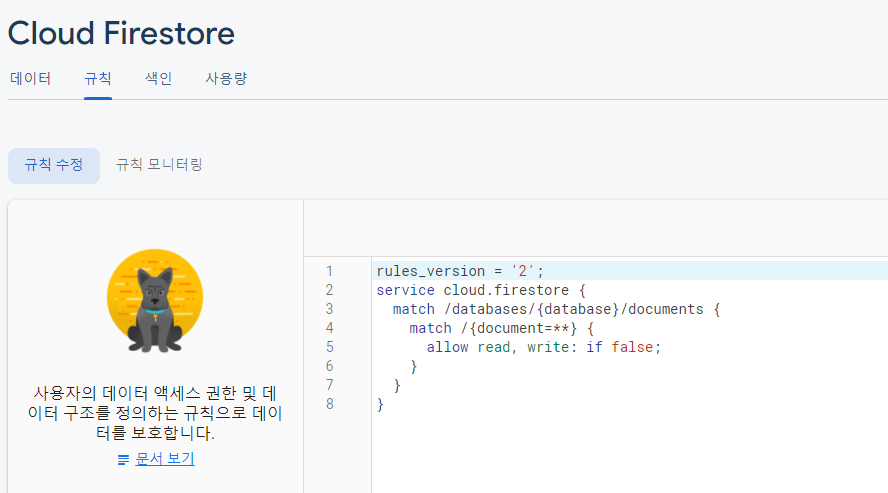
6. Firebase Console에서 보안 규칙 추가
웹, Android 또는 Apple 플랫폼 SDK를 사용하는 경우 Firebase 인증 및 Cloud Firestore 보안 규칙을 사용하여 Cloud Firestore의 데이터에 보안을 적용합니다.
다음은 시작하는 데 사용할 수 있는 기본 규칙 세트입니다. Console의 규칙 탭에서 보안 규칙을 수정할 수 있습니다.

// Allow read/write access on all documents to any user signed in to the application
service cloud.firestore {
  match /databases/{database}/documents {
    match /{document=**} {
    	//테스트
        allow read, write: if true;
      //allow read, write: if request.auth != null;
    }
  }
}
인증과 함께 규칙을 설정하면 database를 다루는데 보안성이 강화될 것이다.
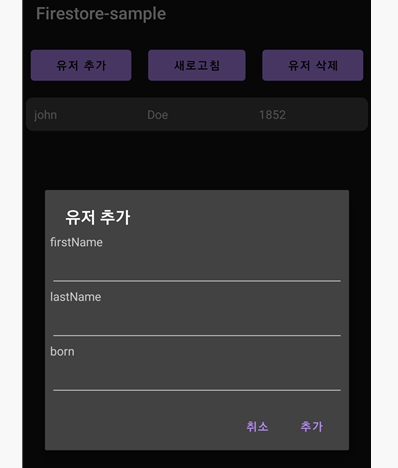
7. 최종 Test
7.1) 앱 최초 실행

7.2) 새로고침 버튼 클릭


7.3) 유저 추가 버튼 클릭


정상적으로 들어오는 것을 확인했다.
7.4) 유저 삭제

삭제는 읽기나 추가처럼 collection만 참조해서는 안되고 document 자체를 참조해야 하는데 id값을 받아와야 구현이 가능하겠다.
그리고 컬렉션 삭제는 adroid에서는 불가능!
<참고>
https://firebase.google.com/docs/firestore/quickstart?authuser=0#java
Cloud Firestore 시작하기 | Firebase Documentation
Join Firebase at Google I/O online May 11-12, 2022. Register now 의견 보내기 Cloud Firestore 시작하기 이 빠른 시작에서는 Cloud Firestore를 설정하고 데이터를 추가한 후 Firebase Console에서 방금 추가한 데이터를 확인
firebase.google.com
'Andorid' 카테고리의 다른 글
| [Kotlin] Local Storage에 logcat파일 만들기 (0) | 2022.08.25 |
|---|---|
| [Kotlin] Firebase 연동 & Realtime Database 조작 (0) | 2022.04.03 |
| [Android] wifi를 통한 무선 디버깅(ADB) (0) | 2022.03.24 |
| [Android] android studio - github 연동 (0) | 2022.03.23 |
| [Android / Java] firebase를 이용한 구글 로그인 연동 (2) | 2022.03.22 |