[Kotlin] / [코틀린]
Java에서 Kotlin으로 Conversion 작업하기(2)
- [when 문, RequestBody, okHttp : Interceptor, CustomAdapter : ViewHolder ]
안드로이드에서 100번 강조해도 모자를 코틀린의 사용.
그 두 번째 시간.
1. if문 대신 when문

코틀린에서 when 문은 switch 문과 비슷하다.
범위를 지정할 수도 있고 조건식을 넣을 수도 있다.
        //In Java
        if (itemName == getString(R.string.customer_search)) {  //Customer - Customer Search
            fragment = SearchCustomerFragment()
            fragmentTag = cFunction.TAG_CUSTOMER_SEARCH
        } else if (itemName == getString(R.string.customer_management)) {  //Customer - Customer Management
            fragment = ManageCustomerFragment()
            fragmentTag = cFunction.TAG_CUSTOMER_MANAGE
        } else if (itemName == getString(R.string.survey)) {  //Customer - Sur

        ...


        //In Kotlin
        when (itemName) {
            //Customer - Customer Search
            getString(R.string.customer_search) -> { fragment = SearchCustomerFragment() ; fragmentTag = cFunction.TAG_CUSTOMER_SEARCH }
            //Customer - Customer Management
            getString(R.string.customer_management) -> { fragment = ManageCustomerFragment() ; fragmentTag = cFunction.TAG_CUSTOMER_MANAGE }
            //Customer - Survey
            getString(R.string.survey) -> { fragment = SurveyFragment() ; fragmentTag = cFunction.TAG_SURVEY }

            ....
2. RequestBody

Java에서 RetroFit 라이브러리를 이용해 HTTP 통신할 때, Multi-part 타입의 데이터를 담기 위해서 미디어 타입을 설정해줘야 한다.
val APPLICATION_JSON = "application/json; charset=utf-8"

//In Java
RequestBody reqIndividual = RequestBody.create(gson.toJson(individualApplication), MediaType.parse(APPLICATION_JSON));
RequestBody reqGuarantee = RequestBody.create(gson.toJson(guarantee), MediaType.parse(APPLICATION_JSON));
RequestBody reqAreaEvaluation = RequestBody.create(gson.toJson(areaEvaluation), MediaType.parse(APPLICATION_JSON));
RequestBody reqExceptionAprv = RequestBody.create(gson.toJson(exceptionAprv), MediaType.parse(APPLICATION_JSON));
RequestBody reqRelationInfo = RequestBody.create(gson.toJson(relationInfo), MediaType.parse(APPLICATION_JSON));

//In Kotlin
val reqIndividual: RequestBody = gson!!.toJson(individualApplication).toRequestBody(APPLICATION_JSON.toMediaTypeOrNull())
val reqGuarantee: RequestBody = gson!!.toJson(guarantee).toRequestBody(APPLICATION_JSON.toMediaTypeOrNull())
val reqAreaEvaluation: RequestBody = gson!!.toJson(areaEvaluation).toRequestBody(APPLICATION_JSON.toMediaTypeOrNull())
val reqExceptionAprv: RequestBody = gson!!.toJson(exceptionAprv).toRequestBody(APPLICATION_JSON.toMediaTypeOrNull())
val reqRelationInfo: RequestBody = gson!!.toJson(relationInfo).toRequestBody(APPLICATION_JSON.toMediaTypeOrNull())
3. okHttp : Interceptor

Cannot inline bytecode built with JVM target 1.8 into bytecode that is being built with JVM target 1.6. Please specify proper '-jvm-target' optionjvm 버전을 1.6에서 1.8로 올려야 한다는 말인듯.


file - setting에서 jvm 버전 바꿔주고 캐시 지운 뒤 클린 및 리빌딩을 해보자.
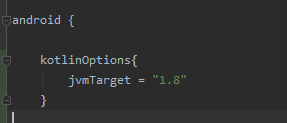
난 이래도 안돼서 build.gradle(app)에 밑에 문구를 추가했다...

    kotlinOptions{
        jvmTarget = "1.8"
    }
4. CustomAdapter : ViewHolder
(잘못된 예)
       //In Java
        var convertView = convertView
        if (convertView == null) {
            convertView = LayoutInflater.from(mContext).inflate(R.layout.layout_item_popup_staff, parent, false)
            mViewHolder = ViewHolder()
            mViewHolder?.txtSequence = convertView.findViewById(R.id.tvSequence)
            mViewHolder?.txtStaffNo = convertView.findViewById(R.id.tvStaffNo)
            mViewHolder?.txtStaffName = convertView.findViewById(R.id.tvStaffNm)
            mViewHolder?.txtStaffPhoneNo = convertView.findViewById(R.id.tvStaffPhoneNo)
            convertView.tag = mViewHolder
        } else {
            mViewHolder = convertView.tag as ViewHolder
        }

        // Data Set(array_NRC)에서 position에 위치한 데이터 참조 획득
        val customer = customers!![position]

        // View에 Data 세팅
        mViewHolder?.txtSequence?.text = (position + 1).toString()
        mViewHolder?.txtStaffNo?.text = customer.employeeNo
        mViewHolder?.txtStaffName?.text = customer.customerNm
        mViewHolder?.txtStaffPhoneNo?.text = customer.telNo
        return convertView


        //In Kotlin
                mViewHolder = convertView.tag as ViewHolder

        // Data Set(array_NRC)에서 position에 위치한 데이터 참조 획득
        val customer = customers!![position]

        // View에 Data 세팅
        mViewHolder?.txtSequence?.text = (position + 1).toString()
        mViewHolder?.txtStaffNo?.text = customer.employeeNo
        mViewHolder?.txtStaffName?.text = customer.customerNm
        mViewHolder?.txtStaffPhoneNo?.text = customer.telNo
        return convertView
와 이건 좀 놀랍도록 혁명적이다. 간단히 tag라는 메서드 하나로 이렇게 간결해지다니...
라고 생각했으나 위의 코드는 잘못된 것이다.
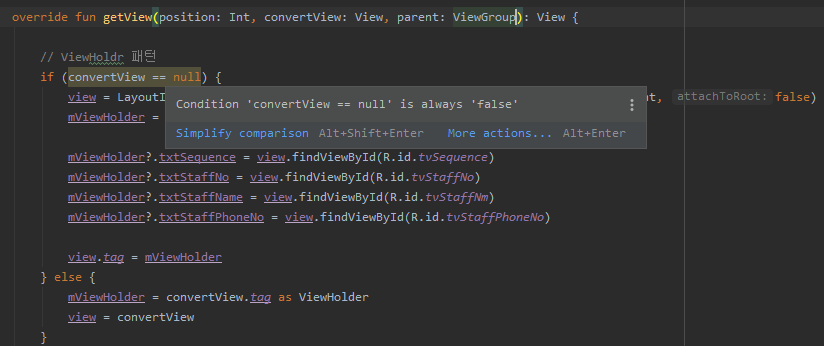
처음 컨버젼을 할 때 아래와 같이 뜨길래 뭣도 모르고 Simplify 눌러줬는데 그러면 if (convertView == null) 일 때의 코드가 다 날아가 버린다.

그 이유는 현재 View에 safe null 처리를 안 했기 때문이다. 따라서 정상 코드로 만들려면 아래와 같이 '?'을 붙여줘야 한다.
    override fun getView(position: Int, convertView: View?, parent: ViewGroup?): View {

        // ViewHoldr 패턴
        if (convertView == null) {
            view = LayoutInflater.from(context).inflate(R.layout.layout_item_popup_staff, parent, false)
            mViewHolder = ViewHolder()

            mViewHolder?.txtSequence = view.findViewById(R.id.tvSequence)
            mViewHolder?.txtStaffNo = view.findViewById(R.id.tvStaffNo)
            mViewHolder?.txtStaffName = view.findViewById(R.id.tvStaffNm)
            mViewHolder?.txtStaffPhoneNo = view.findViewById(R.id.tvStaffPhoneNo)

            view.tag = mViewHolder
        } else {
            mViewHolder = convertView.tag as ViewHolder
            view = convertView
        }

        // Data Set(array_NRC)에서 position에 위치한 데이터 참조 획득
        val customer = customers!![position]

        // View에 Data 세팅
        mViewHolder?.txtSequence?.text = (position + 1).toString()
        mViewHolder?.txtStaffNo?.text = customer.employeeNo
        mViewHolder?.txtStaffName?.text = customer.customerNm
        mViewHolder?.txtStaffPhoneNo?.text = customer.telNo
        return view
    }
<참조 문서>
[Kotlin 문법] 조건문 (if, when)
# if문 1) if문 사용법 코틀린에서 if문의 문법은 특별하지 않다. 하지만 코틀린에서 if문은 특별한 기능이 있다. 바로 값을 리턴할 수 있다. 2) 값을 리턴하는 if문 코틀린에서는 삼항 연산자를 지원
dybz.tistory.com
cannot inline bytecode built with jvm target 1.8 into bytecode that is being built with jvm target 1.6. please specify proper '-
that is being built with jvm target 1.6. please specify proper '-jvm-target' option 에러가 뜬다면!! File-settings안의 kotlin compiler 안의 target JVM version을 바꿔준다 바꿔줘도 에러가 뜬다면 File..
thomass.tistory.com
'Andorid' 카테고리의 다른 글
| [Android] firebase 연동 (최신버전) (2) | 2022.03.22 |
|---|---|
| [Kotlin] applicationContext 가져오기 (0) | 2021.02.10 |
| [Kotlin] Java에서 Kotlin 으로 Migration 작업 (1) (0) | 2021.02.02 |
| [Android / Java] ListView 특정 아이템 클릭 이벤트 막기 (0) | 2021.01.18 |
| [Android / Java] TextWatcher 클래스를 이용한 계산기 로직 만들기 (0) | 2021.01.12 |